Blockchains are often not connected, creating a need for solutions to improve interoperability in the crypto space. The Astar Network, a Layer 1 multi-chain smart contract platform, addresses this issue by connecting blockchains. Because Astar supports the EVM environment, it can be easily added to MetaMask, allowing you to explore various dApps built on the network. This guide will walk you through adding Astar to MetaMask and provide more information about the Astar Network.
Does MetaMask Support Astar?
MetaMask supports all EVM-compatible blockchains, including Astar, making it easy to connect the Astar network to your MetaMask wallet with just a few quick steps.
About Astar Network
Astar Network is a versatile smart contract platform that supports both EVM (Ethereum Virtual Machine) and WebAssembly (Wasm) environments, allowing seamless interoperability and advanced smart contract capabilities. Built on Polkadot as a Layer 1 blockchain, Astar benefits from Polkadot’s shared security and offers a developer-friendly environment with support for Solidity, Vyper, and other languages compatible with EVM bytecode.
Its unique Build2Earn model rewards developers and users, fostering ecosystem growth. Astar aims to be a multi-chain hub, connecting blockchains like Ethereum, Solana, and Cosmos, and enhancing the Polkadot ecosystem with innovative smart contract functionality.
Because Astar Network supports EVM environments, MetaMask users can easily add the network to their MetaMask wallets. By entering the correct network details, Astar Network can be configured with MetaMask, allowing users to explore Astar’s ecosystem.
Astar Network Details
MetaMask users typically have two popular methods for adding the Astar network to their wallets: manually entering the network details through the settings or using a blockchain explorer. While MetaMask supports several other options, these two methods are the most widely used. Whichever method is chosen, it’s important to ensure the accuracy and consistency of the network details to prevent any potential problems.
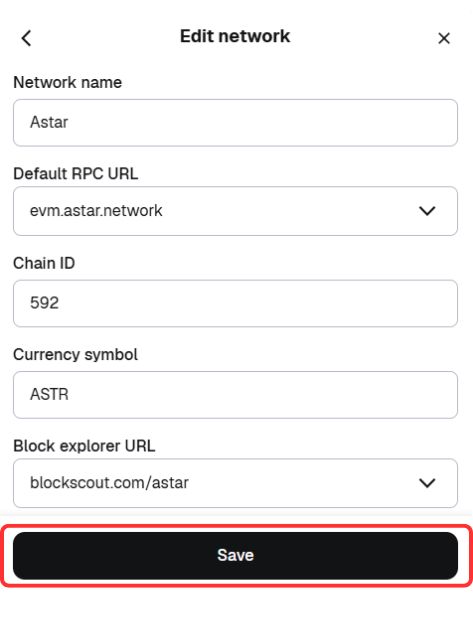
Network Name: Astar Network Mainnet
New RPC URL: https://evm.astar.network
Chain ID: 592
Currency Symbol: ASTR
Block Explorer URL: https://blockscout.com/astar
How to Add Astar to MetaMask
There are two common ways to add a network to MetaMask, along with various third-party methods. However, this guide will focus on the two most secure and reliable options: adding a network manually through MetaMask settings or using a blockchain explorer.
Add Astar Network to MetaMask Manually
MetaMask has been around for quite some time and, with millions of users, it understands the evolving needs of its community. That’s why it offers a straightforward option in the settings menu for manually adding a network by entering specific network details. One advantage of this method is the ability to customize the network’s name, making it easier to distinguish between different chains or testnets—particularly useful when switching networks. Here’s a step-by-step guide on how to manually add the Astar network to MetaMask.
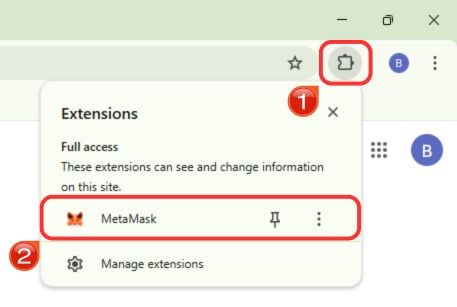
Step 1: Click on the MetaMask icon located in your browser’s extension toolbar to open your wallet.
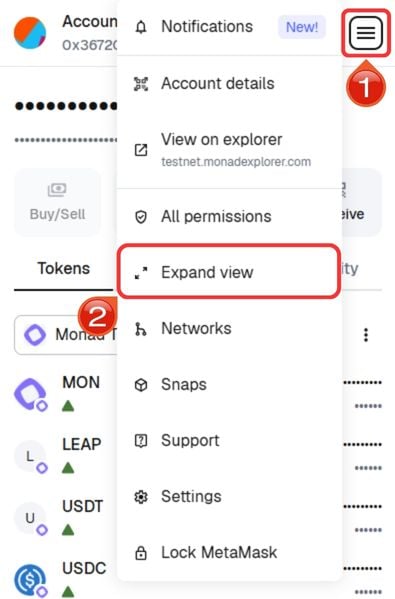
Step 2: To see MetaMask in a full tab, click the “hamburger” icon on the top-right and select “Expand View”.
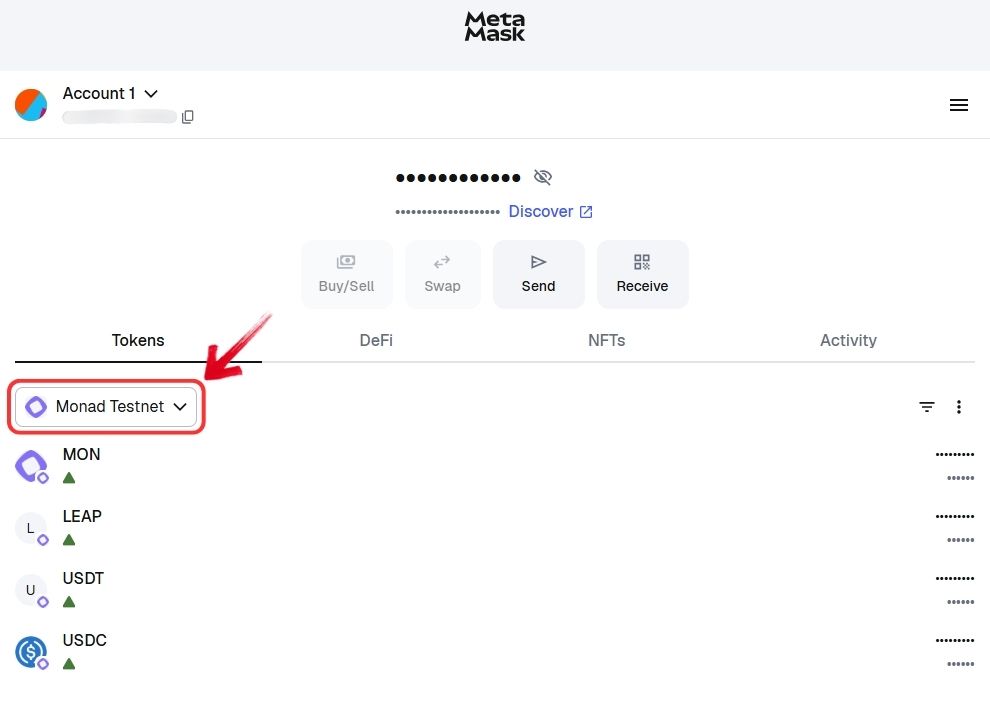
Step 3: After expanding the window, select the “Network” dropdown visible at the middle left.
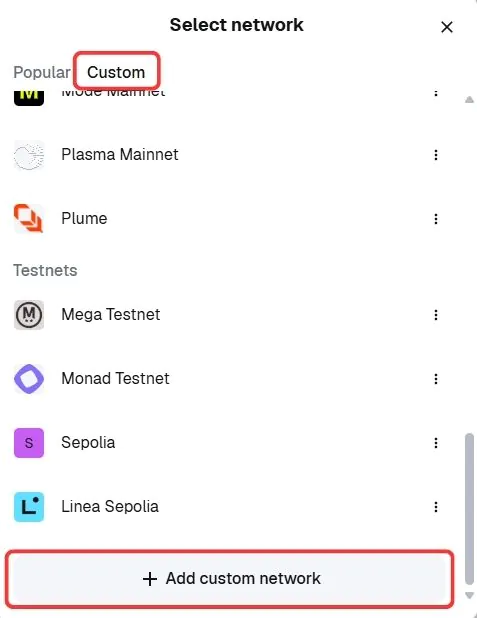
Step 4: On the Custom tab, click “Add custom network” to manually set up Astar’s network information.
Step 5: Fill in all fields using Astar’s RPC data, cross-check it, and press “Save” to complete the setup.
Step 6: MetaMask will automatically move to Astar, allowing immediate interaction.
When manually adding the Astar network, you will need to enter the network details yourself. To ensure your funds’ safety, it’s recommended to verify these details against the official Astar’s documentation available on their website.
Add Astar Network to MetaMask using Blockchain Explorer
Each network has its own blockchain explorer that allows users to verify transactions and track activity using transaction hashes or block numbers. Additionally, these explorers provide a convenient way to add the network to MetaMask. Astar Explorer, the Astar network’s explorer, offers a secure and easy method to add the network to MetaMask with just a single click. Let’s look into how this process works.
Step 1: Open your web browser and visit the Astar Explorer.
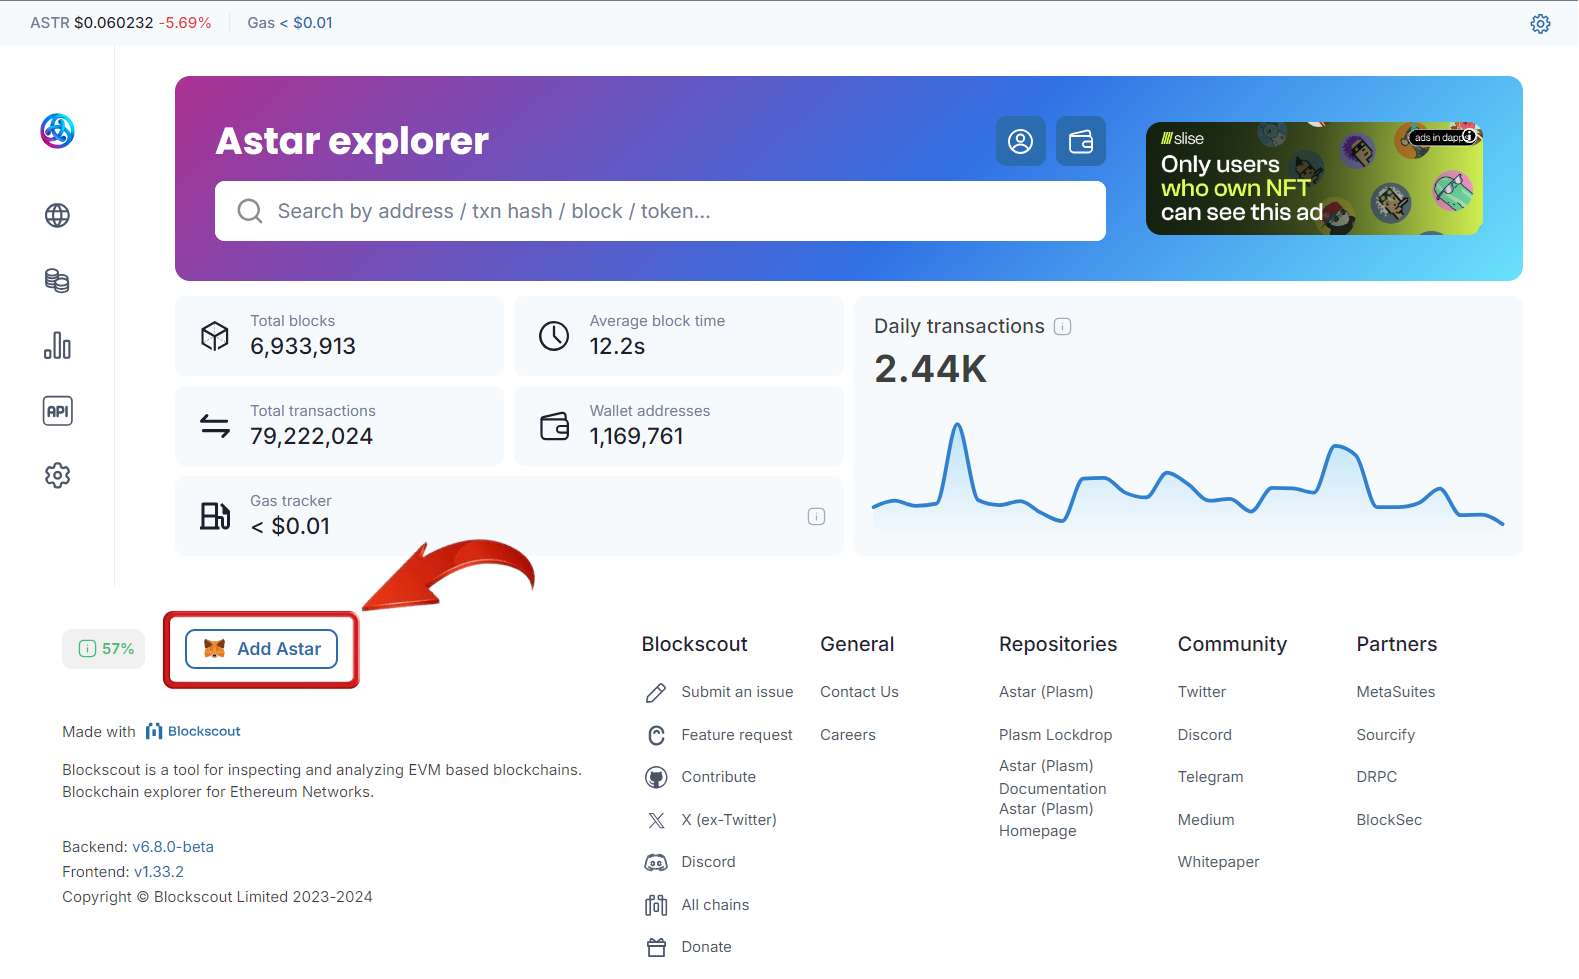
Step 2: Scroll to the bottom of the Astar Explorer homepage and click the “Add Astar” button to start the process.
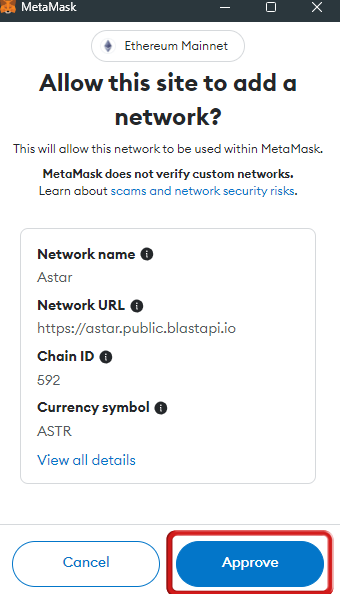
Step 3: AA MetaMask pop-up will appear requesting your approval. Click “Approve” to add the Astar network to MetaMask.
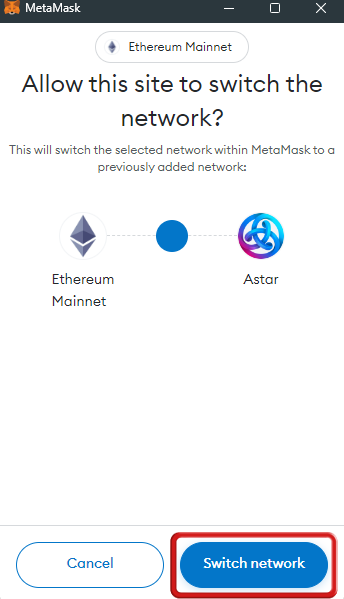
Step 4: Once approved, you can either switch to the Astar network immediately by clicking “Switch Network” or remain on your current network and switch later.
Blockchain explorers are generally considered highly secure since they are often developed by the network’s team or reputable third parties. However, to avoid any risk of financial loss, it’s always important to double-check the network details when adding the Astar network or any other network to MetaMask.
Exploring Astar Network via MetaMask
No matter which method you use, you will have the Astar network configured in your MetaMask wallet, allowing you to interact with Astar’s ecosystem. With its promise of connecting blockchains, Astar brings a wide range of dApps to the crypto space, and with more to come, there’s plenty for MetaMask users to explore. MetaMask users can start exploring DeFi applications, create their own using development tools, or participate in Astar’s governance.
However, to begin any of this, MetaMask users first need to fund their wallets, as every dApp requires ASTR tokens to pay for gas fees. To do this, simply go to a centralized exchange like BYDFi or BingX, where you can purchase ASTR tokens and then transfer them to your MetaMask wallet using the Astar network.
Another option is to use a bridge. Unfortunately, MetaMask’s bridge currently doesn’t support bridging to the Astar network. However, users can use a bridge within the Astar ecosystem to fund their wallets with ASTR tokens, which also gives them an opportunity to interact with the Astar ecosystem.
Bottomline
The Astar Network aims to connect blockchains, enhancing interoperability and offering a variety of dApps for users to explore. By adding Astar to MetaMask, crypto users can easily access and interact with Astar’s ecosystem and experience its unique offerings. Just follow a few simple steps to configure Astar on MetaMask and start exploring the Astar network.
FAQs
1. What are the specific benefits of using Astar Network over other EVM-compatible blockchains?
Astar Network distinguishes itself through several key advantages. Its Build2Earn model incentivizes developers and users, fostering a thriving ecosystem. The support for both EVM and WebAssembly environments expands its capabilities and interoperability potential. Astar’s focus on becoming a multi-chain hub connecting various blockchains positions it as a central player in the broader blockchain landscape. Additionally, its foundation on Polkadot offers shared security and access to a larger network of projects.
2. How does Astar benefit from being built on Polkadot?
Astar inherits Polkadot’s robust shared security, enhancing its protection against attacks while enabling seamless interaction with other connected blockchains.
3. How can I actively participate in the Astar Network ecosystem beyond using dApps?
Beyond using dApps, you can actively contribute to the Astar Network in several ways. Staking your ASTR tokens helps secure the network and earns you rewards. You can also participate in governance by voting on proposals and influencing the network’s future direction. Additionally, if you have development skills, consider building dApps or contributing to open-source projects within the Astar ecosystem.
4. What are other uses for ASTR tokens besides gas fees?
ASTR tokens can be staked for governance, used in DeFi apps, or spent in NFT marketplaces and gaming platforms within the Astar ecosystem.
5. What is the Build2Earn model on Astar?
Build2Earn rewards developers for creating dApps and users for interacting with them, driving ecosystem growth and innovation on the Astar Network.


![How to Change the Language in Phantom [2026]](https://www.cryptowinrate.com/wp-content/uploads/2026/02/How-to-Change-the-Language-in-Phantom-2026-1024x576.jpg)
