

Crypto enthusiasts seeking a versatile platform to interact with XRPL and other major blockchains can choose Atomic Wallet. It allows you to store, send, receive, and swap XRP tokens at competitive fees and at fast speeds. Atomic Wallet offers staking and dApp management in an intuitive, user-friendly interface. For users who are yet to learn what is XRP and how to store it, this article shows you how to get started with Atomic Wallet, one of the best XRP wallets.
Why Do I Need Atomic Wallet?
Atomic Wallet is an excellent choice for anyone holding XRP tokens to store their asset. It features numerous functions and is well-suited for interacting with XRPL. With this wallet, you hold your private keys, so your funds are safer. Atomic Wallet does not ask for personal details or ID checks. You can easily buy and sell XRP using various payment methods, including bank cards, FIAT currencies, and local bank transfers.
Beyond the XRPL network, Atomic Wallet supports multiple blockchains and over 100 different cryptocurrencies, including Bitcoin, Ethereum, and various altcoins. The wallet also includes an in-app dApps store, where you can interact with and build decentralized applications on any supported blockchain.
Atomic Wallet’s multi-currency support and built-in exchange feature allow users to manage diverse crypto portfolios and swap assets within a single interface. Additionally, users can earn passive income in their native $AWC token through staking and other promotional activities. Thanks to these features, over 10 million people trust Atomic Wallet.
Getting Started With Atomic Wallet
Download
Downloading Atomic Wallet is straightforward and your first step toward using the platform. Atomic Wallet is available as an application for Windows, macOS, Linux, iOS, or Android devices. You can also add the Chrome extension to access Atomic Wallet on your desktop. For a smooth installation process, follow these steps to download and get started with Atomic Wallet on your device:
Step 1: Visit the official Atomic Wallet website.
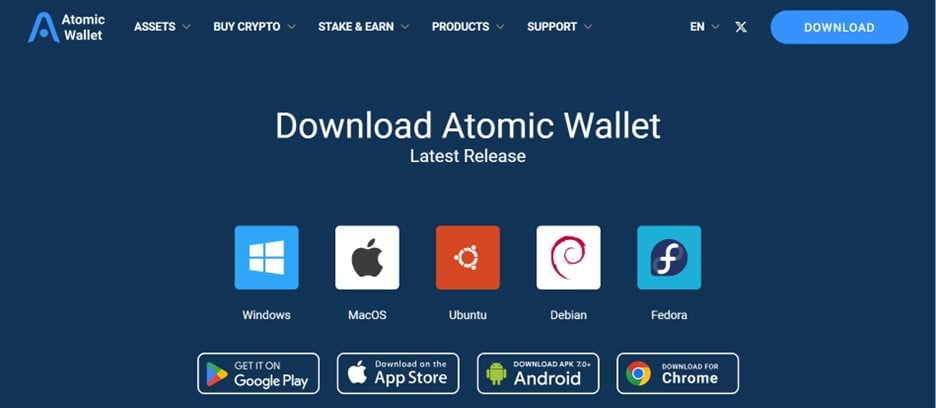
Step 2: Select the appropriate version for your operating system, e.g., Android or iOS.
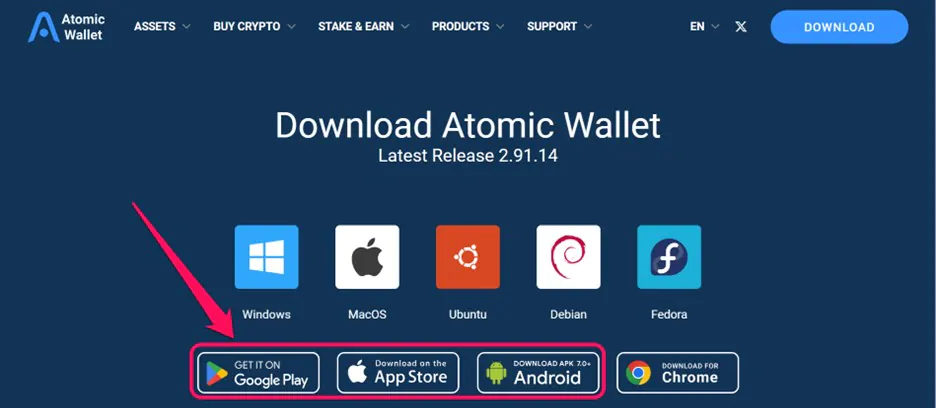
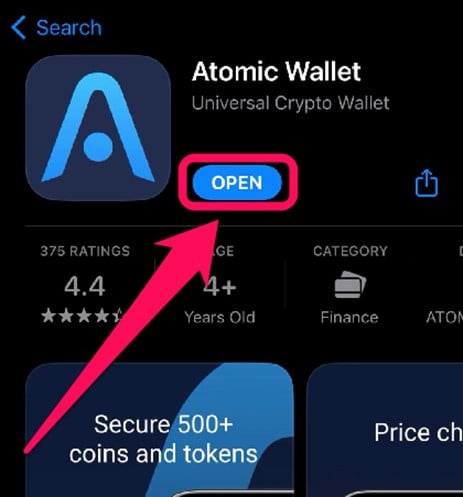
Step 3: You’ll be redirected to your device’s app store. Click the “Install“ or “Get” button associated with the application to begin downloading.
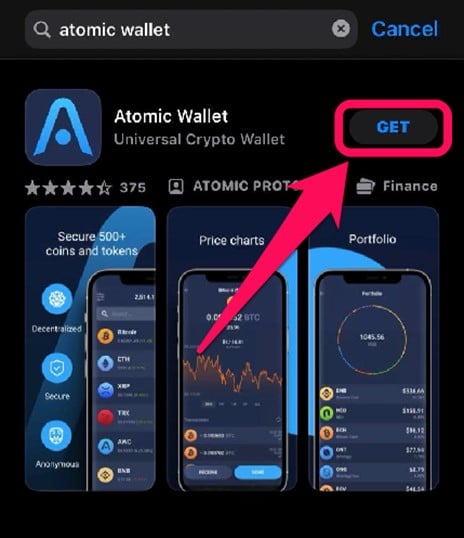
Step 4: When the download tracker hits 100%, the app will be installed on your mobile device. Click Open to launch the Atomic Wallet app.
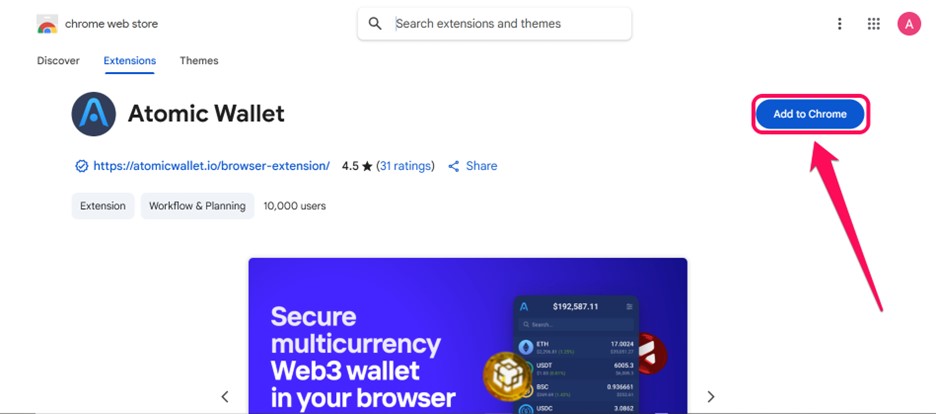
Step 5: Alternatively, select Download for Chrome, and you’ll be redirected to Atomic Wallet on your browser’s extension store.

Step 6: Click “Add to Chrome” (pin the wallet after a successful download for easier access).
Wallet Creation
After downloading the app, you must create an account to get started with Atomic Wallet. Account creation is also easy, thanks to in-app directives on every page you open while creating the account. With your Atomic Wallet account, you can buy, sell, and swap XRP tokens and perform technical tasks like dApp building, staking, testnet interaction, etc.
Here’s a step-by-step guide to seamlessly create your Atomic Wallet account
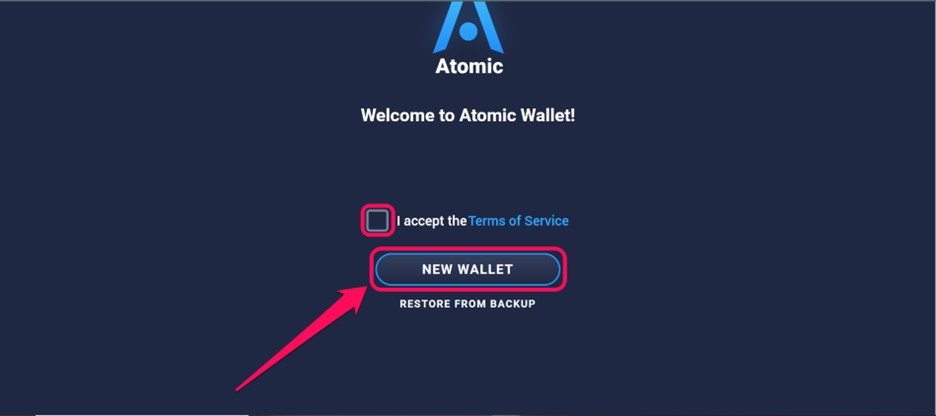
Step 1: Open the installed Atomic Wallet extension on your browser. Accept the Terms of Service by checking the mini box, then click New Wallet.
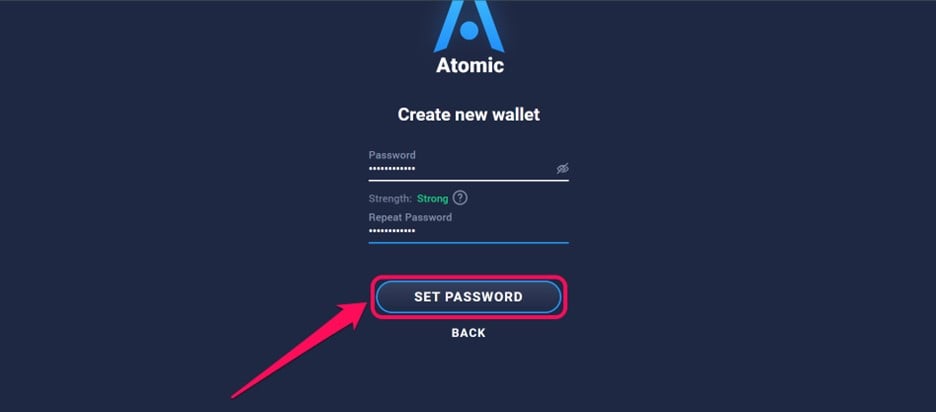
Step 2: Set up a strong and secure password to protect your account. Verify the password, then click Set Password to proceed.
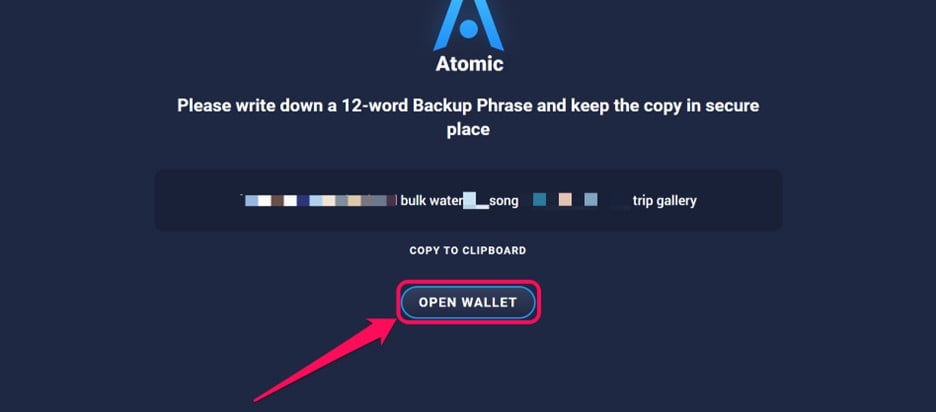
Step 3: You’ll be shown a 12-word passphrase. Please write it down and back up this phrase in a secure location, as it is crucial for account recovery. Then click on Open Wallet to proceed.
Step 4: Enable Atomic Wallet to collect logs for better custom service, and your account is ready for deposit and XRP trading.
Quick Tour of Atomic Wallet
One of Atomic Wallet’s strengths is its unique, user-friendly interface, with tabs and functions clearly defined. Upon opening the app, you can access all the Wallet, Exchange, History, Staking, and NFT sections. The Wallet section displays your crypto balances and a list of all assets you own.
You can easily purchase crypto on the Buy Crypto tab or access 24-hour customer assistance on the Support page. Additionally, the Settings tab brings account modification and security options to your fingertips, allowing you to make necessary edits whenever possible.
Bottom Line
To get started with Atomic Wallet, you must download the app and create an account. Atomic Wallet is among the best XRP wallets, but it also offers multi-chain support for users seeking an all-in-one crypto platform. When creating your Atomic Wallet account using the steps above, ensure that you store all essential passkeys for seamless account access.
FAQs
1. Where do I find my Wallet Address on Atomic Wallet?
Open the Wallet tab and click the asset for which you need your address. Next, tap on Receive and you’ll find your wallet address. Click the address or the Copy button to copy the address to your device’s clipboard.
2. How do I send an asset in Atomic Wallet?
Select the coin you want to send in the ‘Wallet’ tab. Click Send, then paste the receiving address into the field. Enter the amount you wish to send, review the fees, and click Confirm.
3. How do I contact the Atomic Wallet Team about an issue?
Open the Support tab, then enter your email address and provide a brief description of your issue. The Atomic Wallet Support Team typically responds to complaints within 1 hour of submission.
4. How can I withdraw money from my Atomic Wallet account?
Log in to your Atomic Wallet account, then head to the “Wallet” tab and pick a coin you want to withdraw. Click the “Send” button. Select the amount you wish to transfer. Finally, click “Send” to complete the withdrawal.
5. Can I make money from Atomic Wallet?
Atomic Wallet enables individuals to receive rewards on staking ATOM, Tezos, TRON, BAND, and other coins with 5-23% APR. The application allows users to control their funds and to keep their private keys encrypted.