

- •Plasma is a stablecoin-focused blockchain with over 100 DeFi integrations at launch.
- •Users must hold XPL in their wallet to cover gas fees and enable transactions.
- •USDT is the main asset on Plasma with options to transfer or earn yield through Savings.
Plasma’s recent launch has put it firmly in the spotlight. Its unique positioning as the “blockchain for stablecoins” and the impressive 100+ integrations with top DeFi protocols right at launch have drawn massive attention. But exploring a new blockchain can feel overwhelming, from gas fees to choosing the right wallet and figuring out where to start.
This guide is designed to make it simple. We’ll walk you through everything step by step, showing you the most straightforward and cost-efficient way to move your funds, add tokens to your wallet, and start exploring Plasma’s ecosystem. By the end, you’ll be ready to make your first transfer, try DeFi vaults, and experience what Plasma has to offer.
Everything You to Know to Get Started on Plasma
For anyone stepping onto a new blockchain, the best advice is always to pause and learn the basics first. It’s important to know the network’s gas fees, whether it’s EVM-compatible, and what its native token is, because that token is what powers transactions. Many users lose access to their funds simply because they sent tokens to a network without holding the gas token needed to move them.
Take Plasma as an example. Its native token is XPL, and it’s required to pay for gas fees. If someone transfers 50 USDT to their Plasma address without holding XPL, those funds are effectively stuck until they acquire some XPL to pay for a transaction.
Here’s what matters most before you begin:
1. Wallet: Plasma is EVM-compatible, so wallets like MetaMask or Trust Wallet work perfectly. They let you hold XPL, lend on Plasma lending vaults, and interact with DeFi protocols.
2. Gas Fees: Every transaction; swapping tokens, lending, or bridging funds, will require a small amount of XPL.
Loading...
Rank #Token Symbol
-
All-Time High
-
Current Price
-
Market Cap
-
Total Supply
-
3. USDT on Plasma: Right now, USDT is at the center of Plasma’s ecosystem. You can lend USDT on lending vaults, and the payment system currently supports USDT only.
This guide will answer each of these questions step by step, then take you through lending on Plasma vaults so you can start generating yield confidently.
Setting Up Your Wallet for Plasma Network
The very first step to using any blockchain is having a Web3 wallet that’s compatible with the network. Plasma doesn’t have its own official wallet yet, so the best option is to use MetaMask. You can also use Trust Wallet, since both support EVM-compatible networks like Plasma.
However, Plasma is not added by default, you’ll need to configure your wallet manually using Plasma’s RPC details. Here’s how:
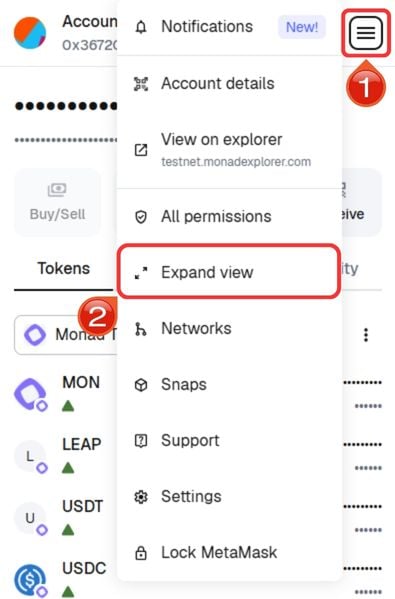
Step 1: Open MetaMask and click on the three-dot menu in the top-right corner,and then click on “Expand view” to open MetaMask in a new tab.
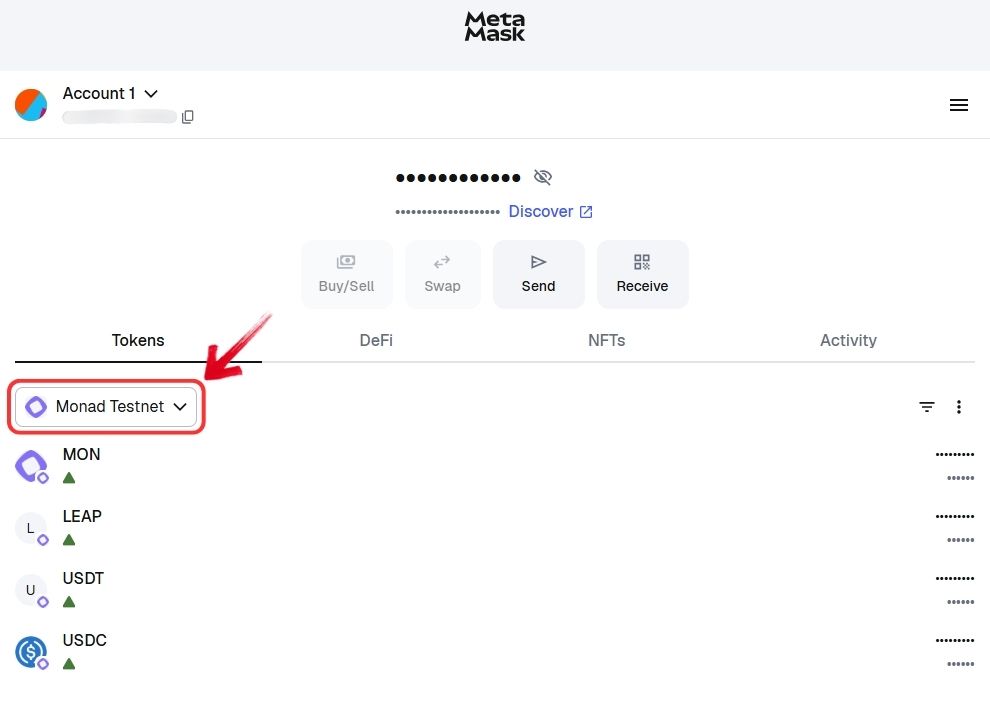
Step 2: Now click on the “Network” dropdown menu in MetaMask.
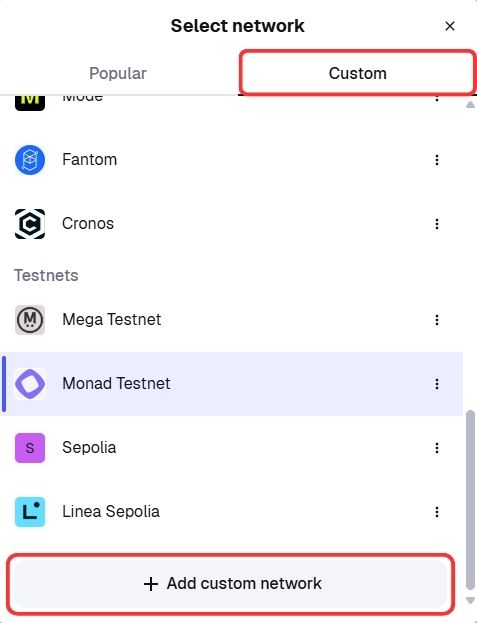
Step 3: In the dropdown, go to the “Custom” tab and click on “Add custom network”.
Step 4: Enter the Plasma Network details and then click “Save” to add Plasma to your MetaMask wallet.
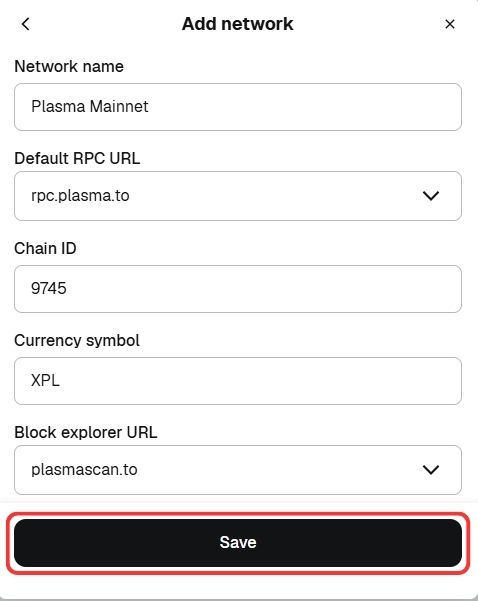
Quick Tip: The manual method is the most secure way to add any network. For a quick setup, you can also click the “Add Plasma to MetaMask” button below. It will automatically fill in all the required network details for you, letting you add Plasma to your MetaMask wallet with just one click.
Download MetaMask for your device


Getting $XPL Tokens
The next step is to add funds to your Plasma wallet. A good practice is to transfer the gas token first, so you don’t risk getting stuck without the ability to move other assets.
Every blockchain charges a transaction fee, often called gas fees. On Plasma, these fees are paid in the native $XPL token. That means your wallet must hold some XPL before you can transfer or interact with any other tokens on the network.
For this guide, we’ll use BloFin Exchange. BloFin not only lists $XPL but also supports direct withdrawals on the Plasma network. Once you’ve purchased XPL, you can withdraw it directly to your Plasma wallet address using the Plasma network option. This ensures you have gas tokens ready before transferring stablecoins or exploring DeFi on Plasma.
Step 1: Open the BloFin Exchange in your browser and make sure you are signed in to your account.
Step 2: From the top menu, click on the “Spot” tab, and then click on the “Spot” option from the dropdown.

Step 3: In the Spot interface, open the “Asset” dropdown and search for XPL/USDT trading pair.
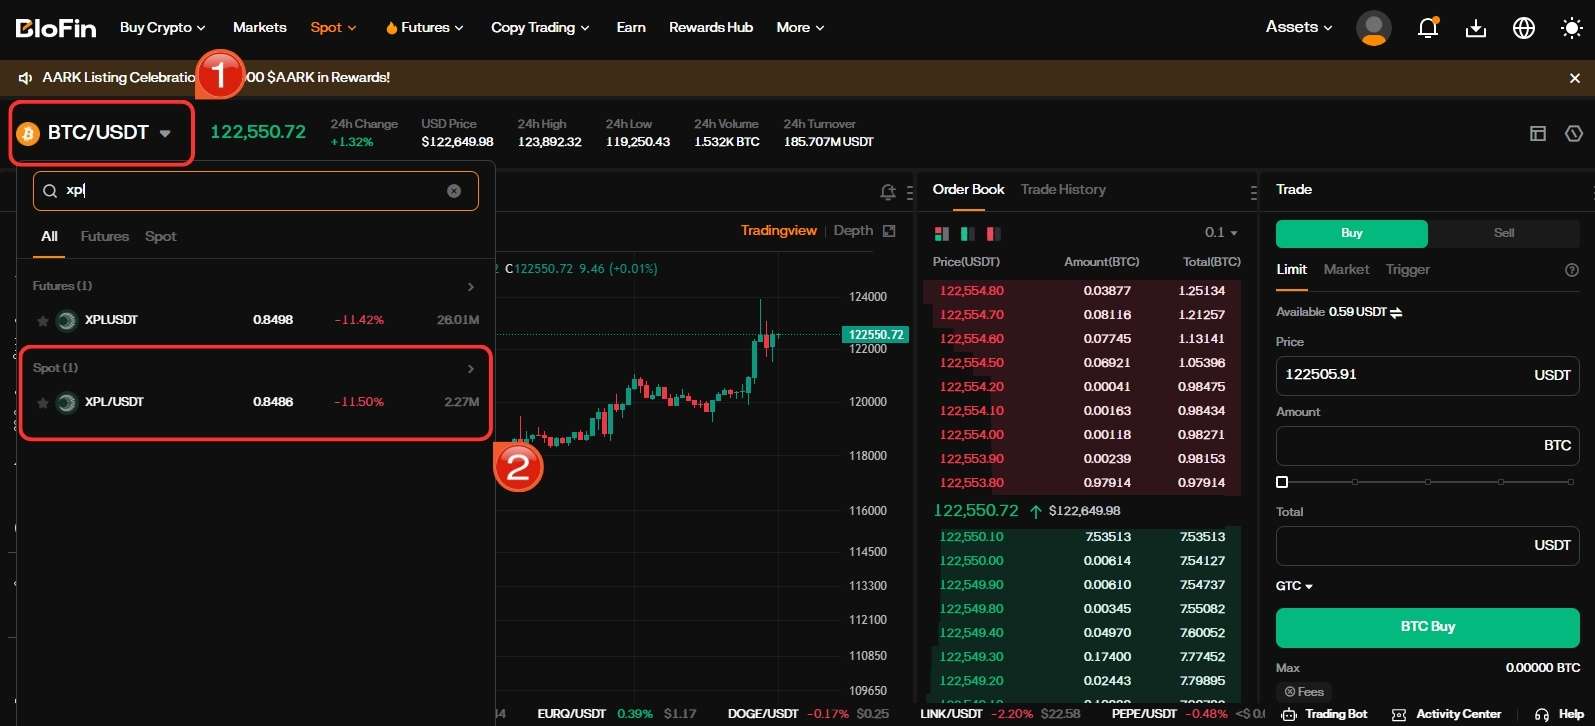
Step 4: Use the trading panel on the right to place your XPL buy order. You can choose between market or limit order depending on your preference.
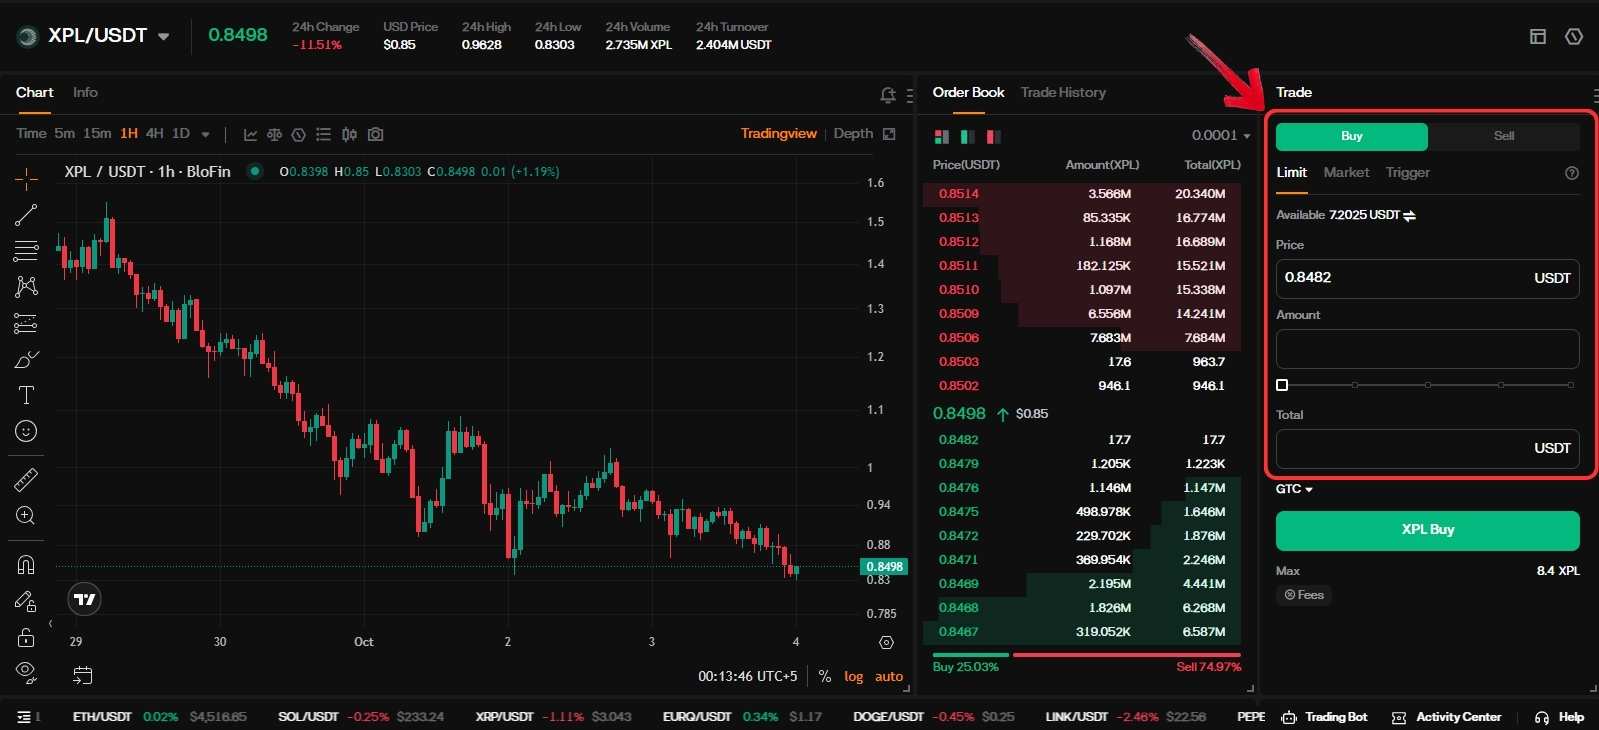
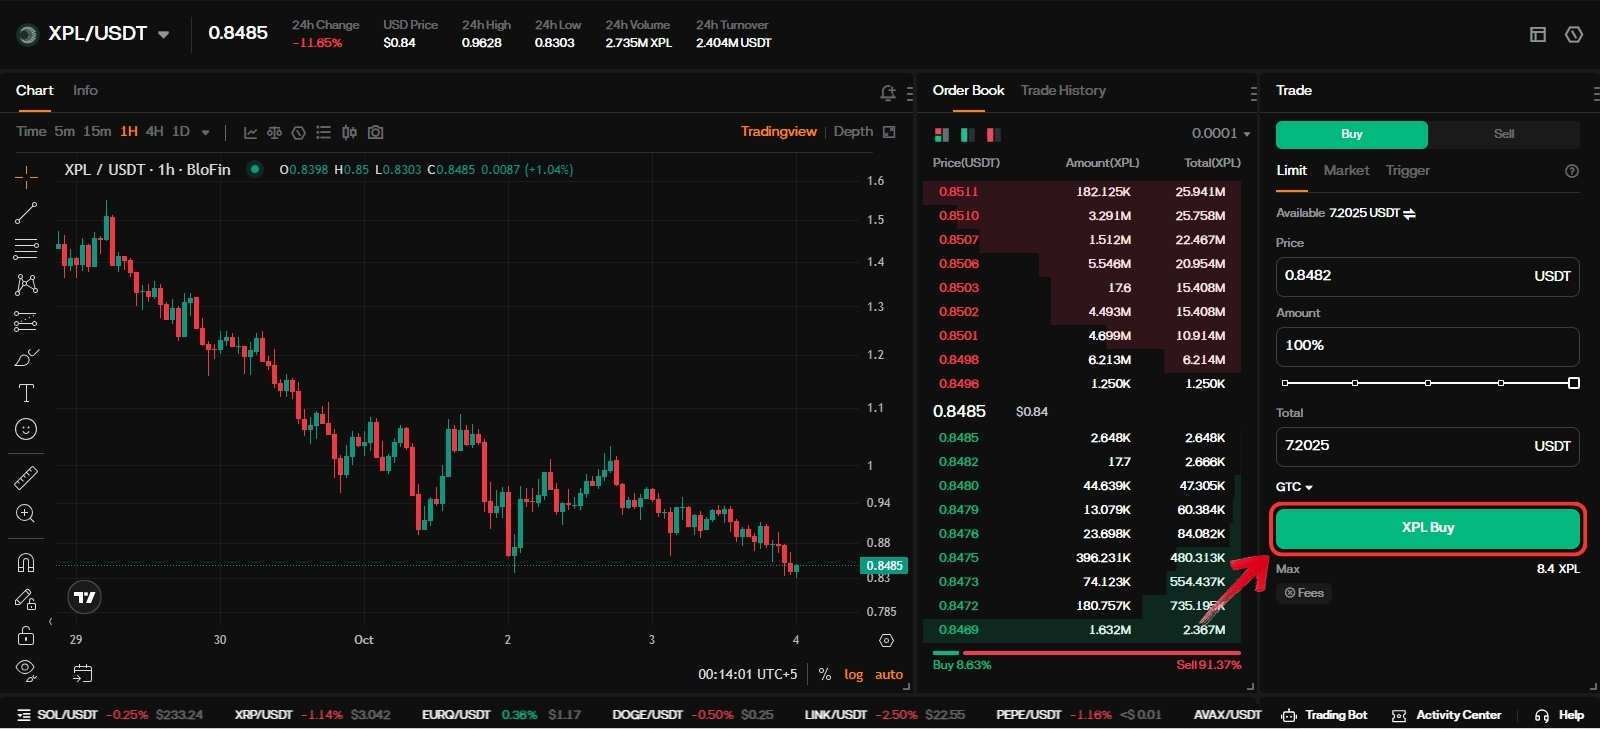
Step 5: Once ready, click the “XPL BUY” button to confirm your purchase.
Once you’ve made the purchase, the next step is to transfer your assets to your Plasma wallet. You can do this directly on BloFin since the Plasma network is supported. Here’s how:
Step 1: On the BloFin homepage, click on “Assets” in the top navigation bar, then select “Withdraw” from the dropdown menu.
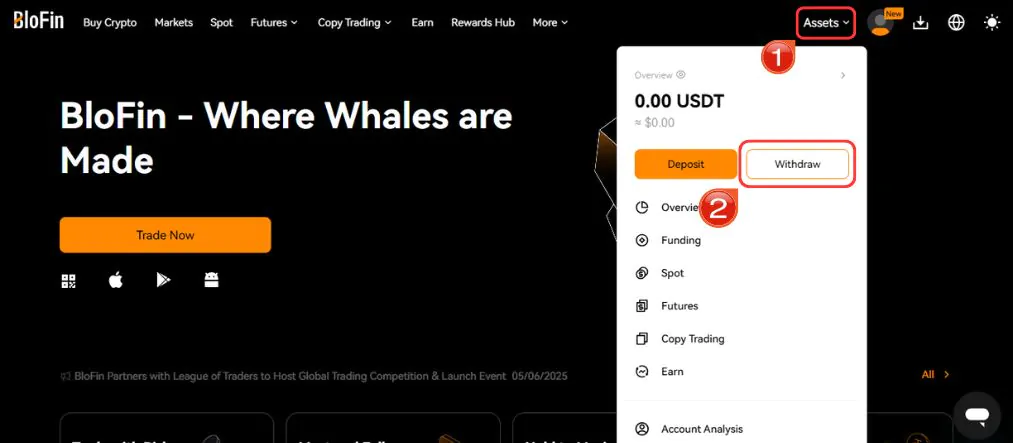
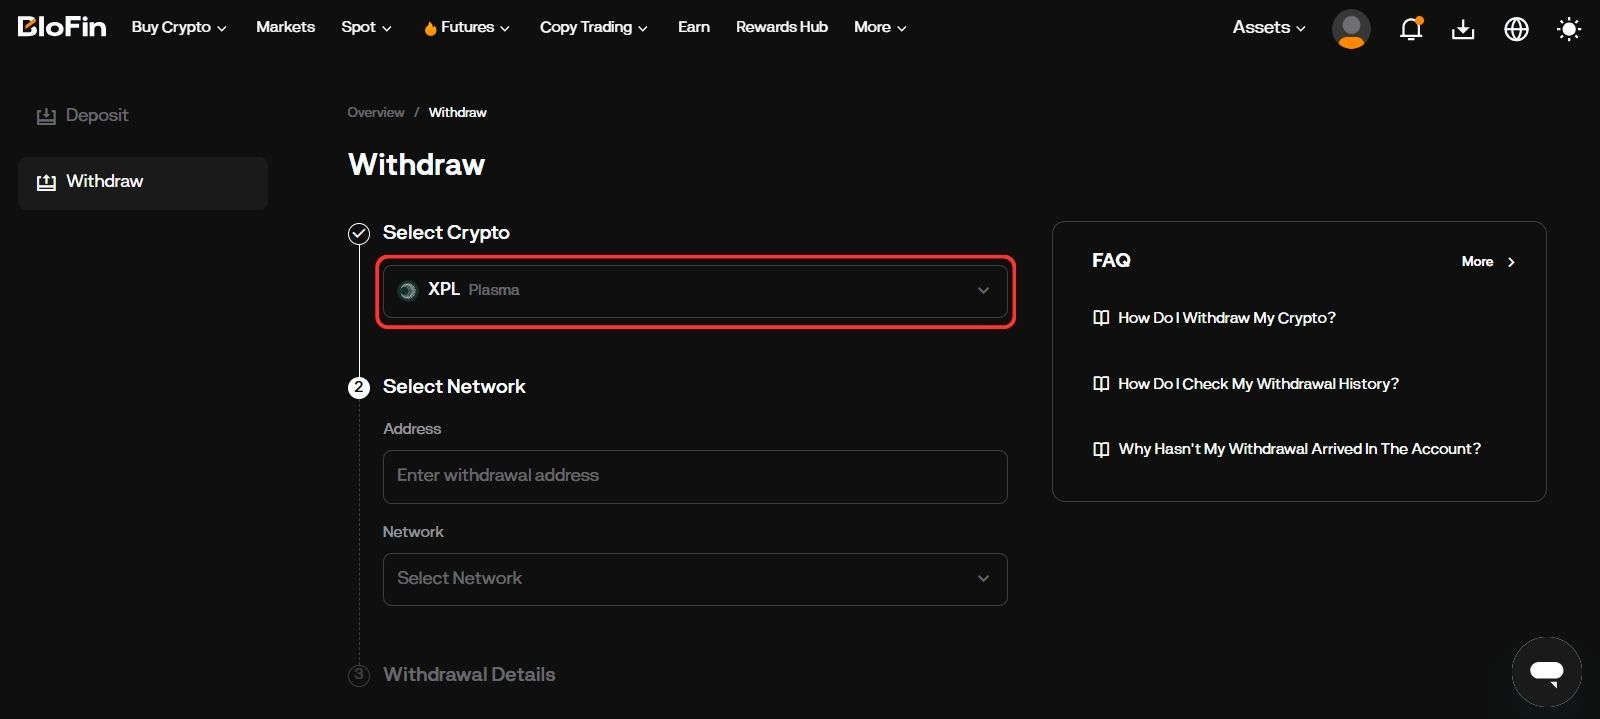
Step 2: In the “Select Crypto” field, choose “XPL” from the list.
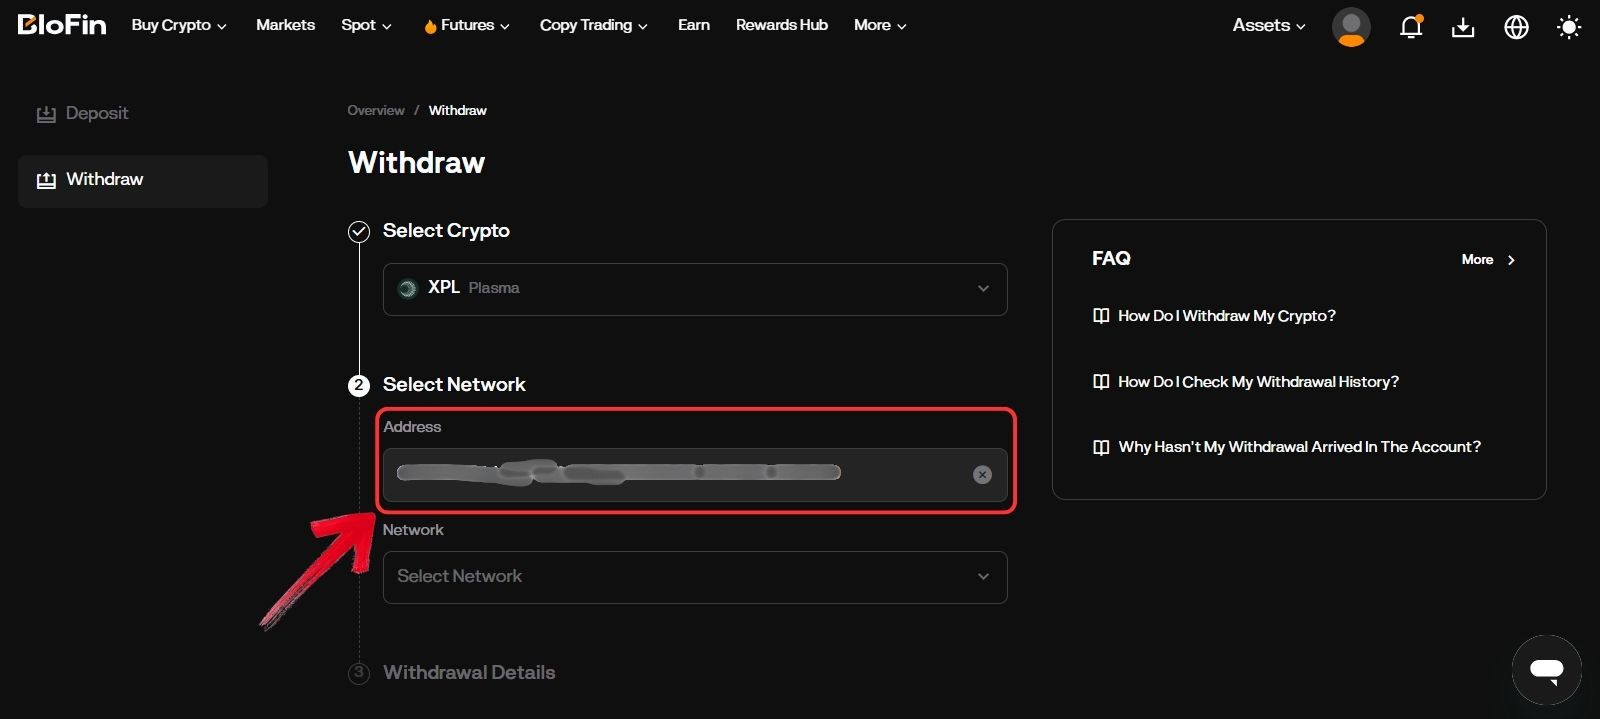
Step 3: In the “Address” field, paste your Plasma-compatible wallet address.
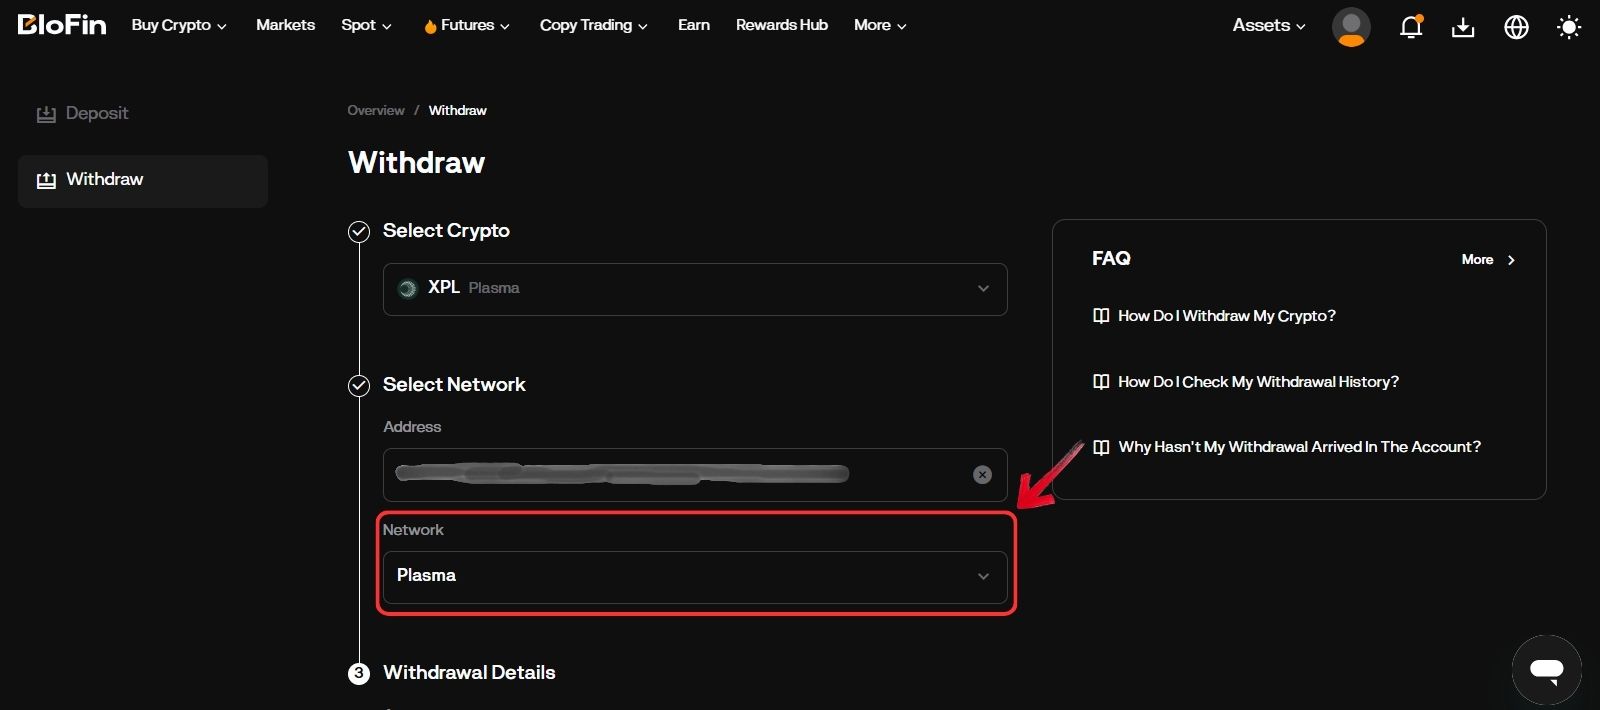
Step 4: In the “Network” field, select Plasma to transfer XPL directly to your Plasma wallet.
Step 5: In the “Amount” field, enter the number of “XPL” tokens you want to withdraw.
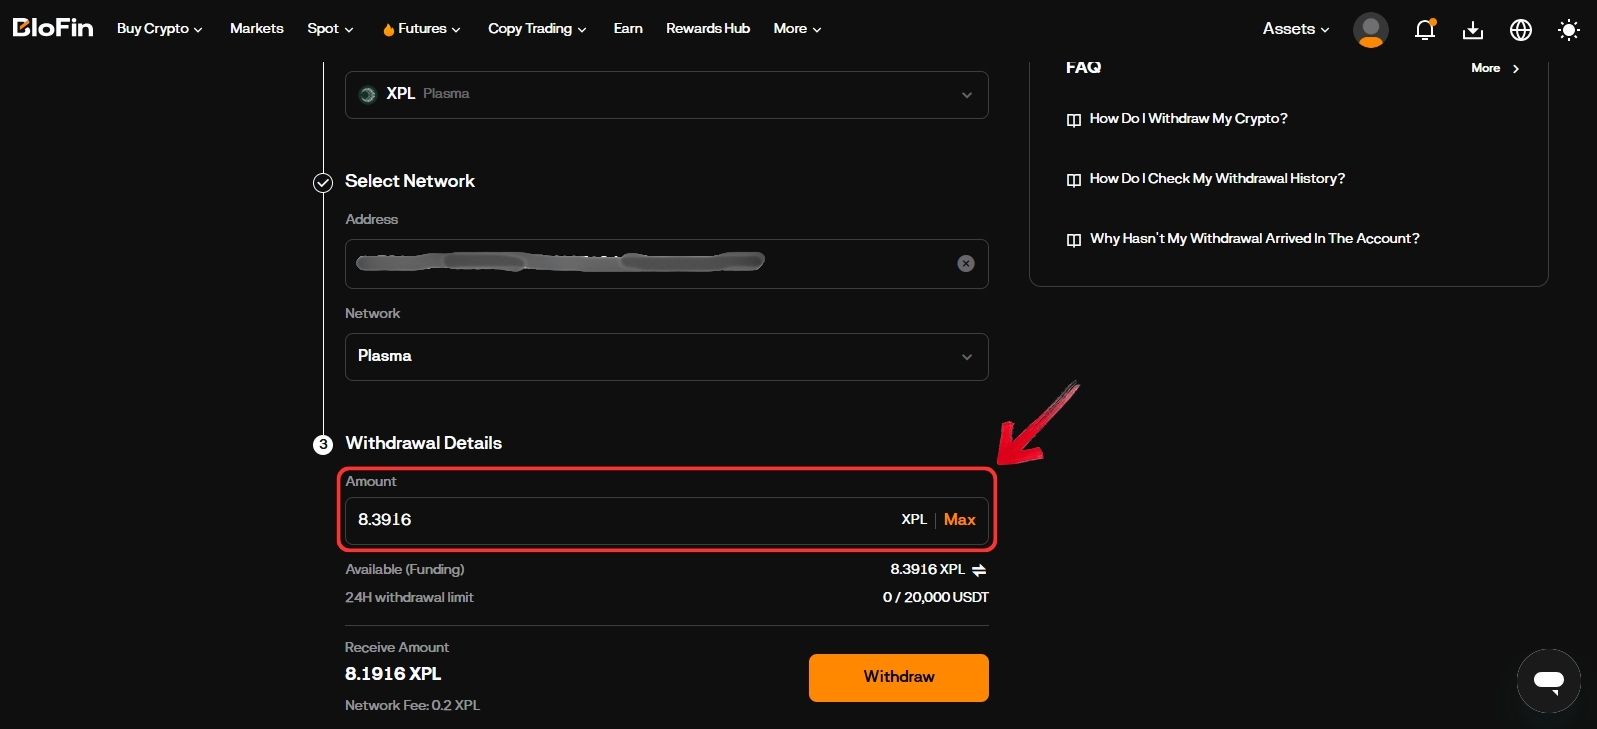
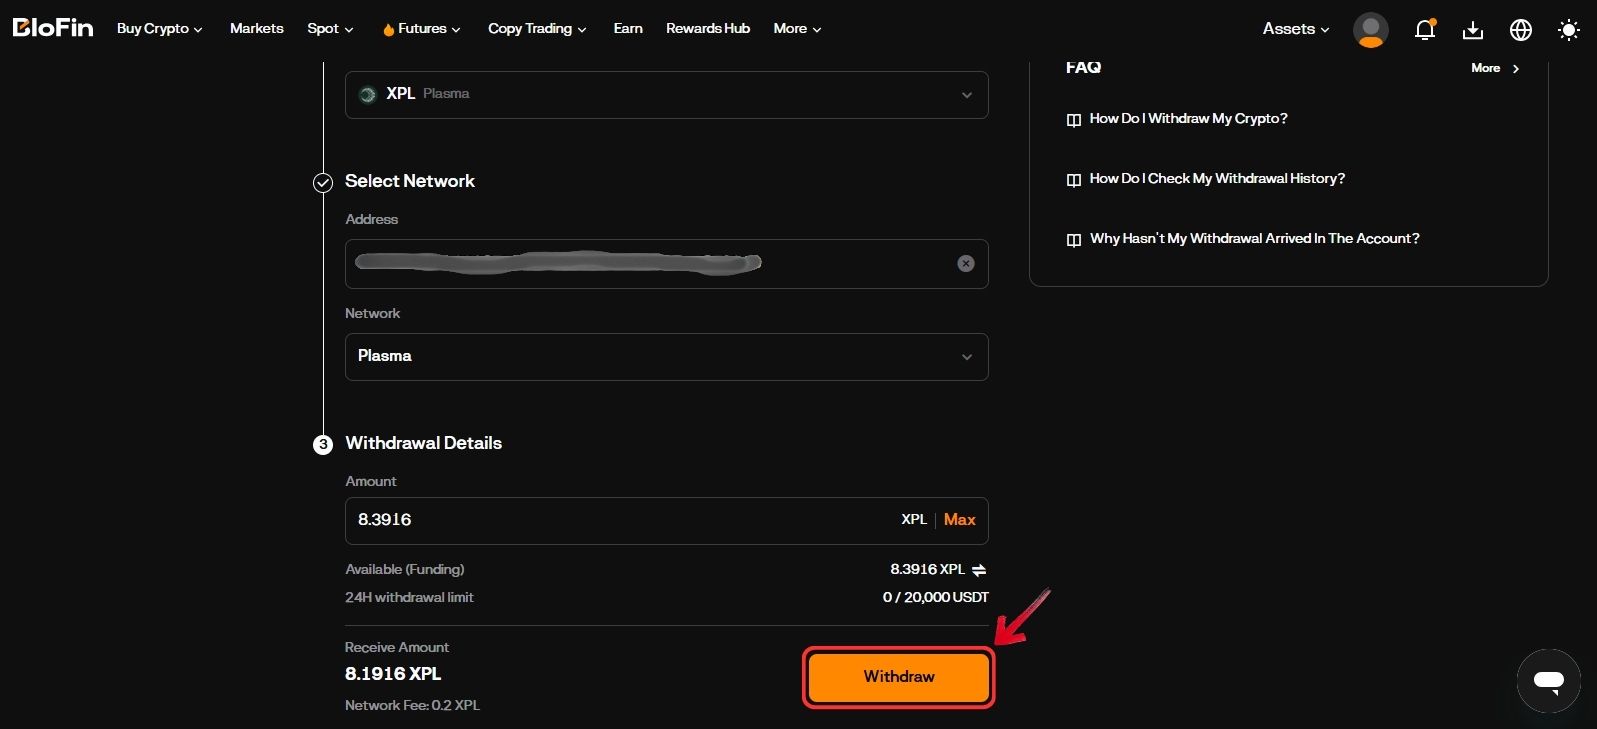
Step 6: Review the details, then click on the “Withdraw” button to confirm.
If you already hold funds in a Web3 wallet like MetaMask, you don’t necessarily need to use an exchange withdrawal. Instead, you can simply bridge your funds to the Plasma network using supported platforms. We’ve published a complete, step-by-step guide to bridging assets to the Plasma network.
Swapping XPL to USDT on Plasma
With the initial steps complete, you can now head over to the official Plasma website to start exploring, whether that’s using lending vaults to earn yield or simply transferring USDT to another Plasma wallet.
But before you can interact with Plasma’s products, you’ll need USDT on the Plasma network. While it’s possible to transfer USDT directly, remember that without holding XPL in your wallet, you wouldn’t be able to make any transactions. Since XPL is required to pay for gas, the safer approach is to first transfer XPL (for fees) and then swap a portion of it into USDT.
For this, we’ll use Oku Trade, a non-custodial DeFi meta-aggregator that supports Plasma network. Here’s how:
Step 1: Open your browser and go to the official Oku Trade, and click on “Connect Wallet” to link your Plasma wallet.
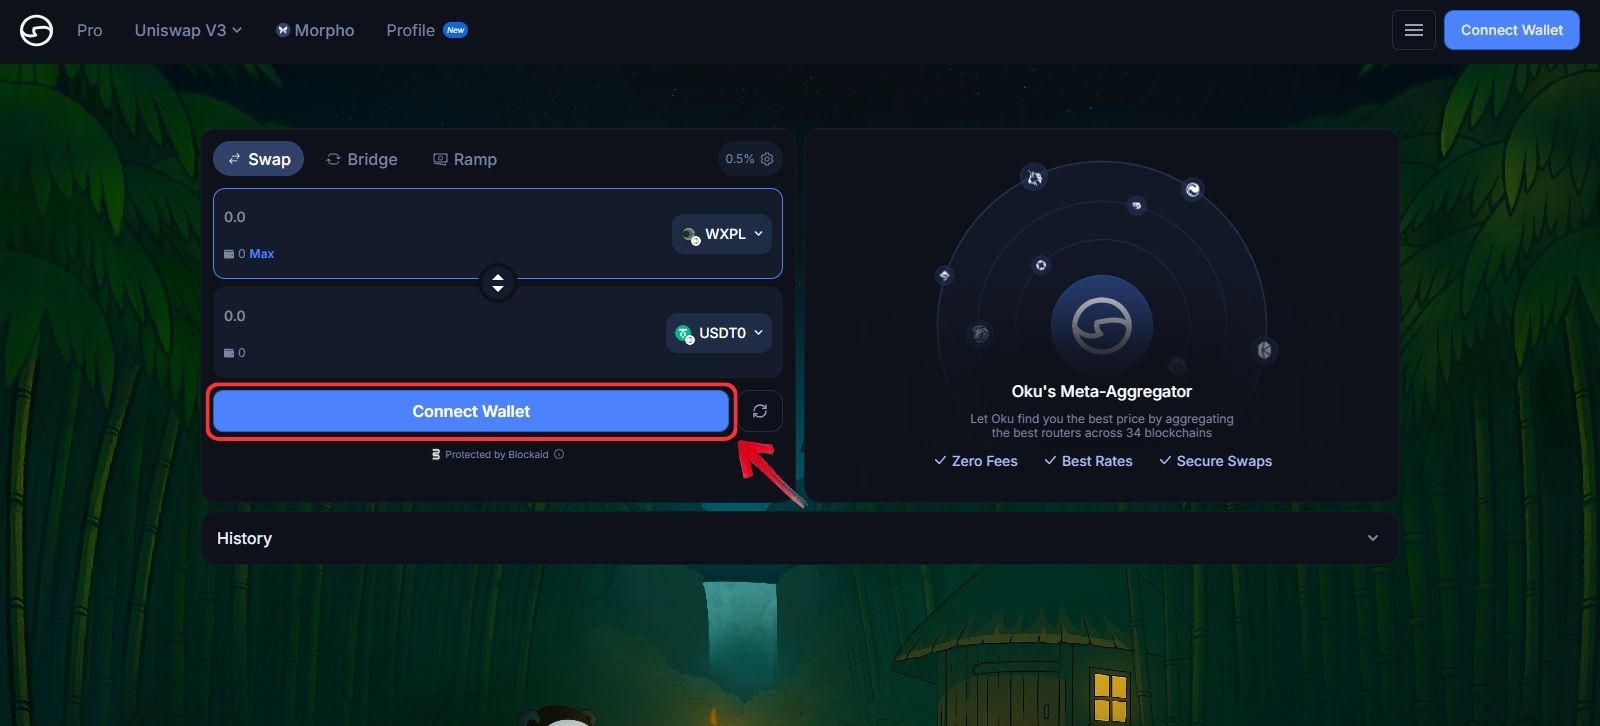
Step 2: After connecting your wallet, click “Sign In” to enable trading, swapping, or using the fiat ramp on Oku Trade.

Step 3: In the swap interface, select “XPL” in the From field and enter the amount you want to swap.
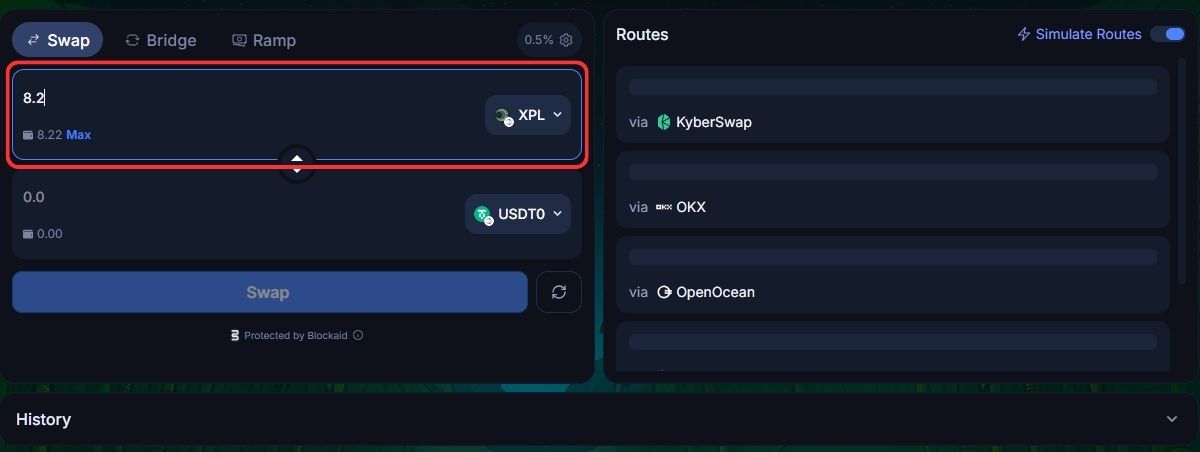
Step 4: In the To field, select “USDT”. Oku Trade will automatically display the best available route along with transaction details.
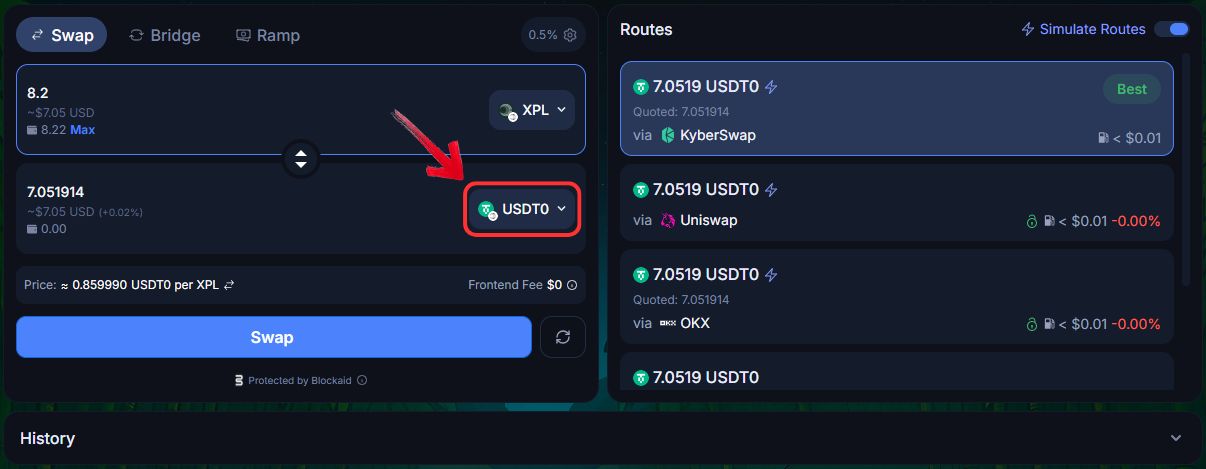
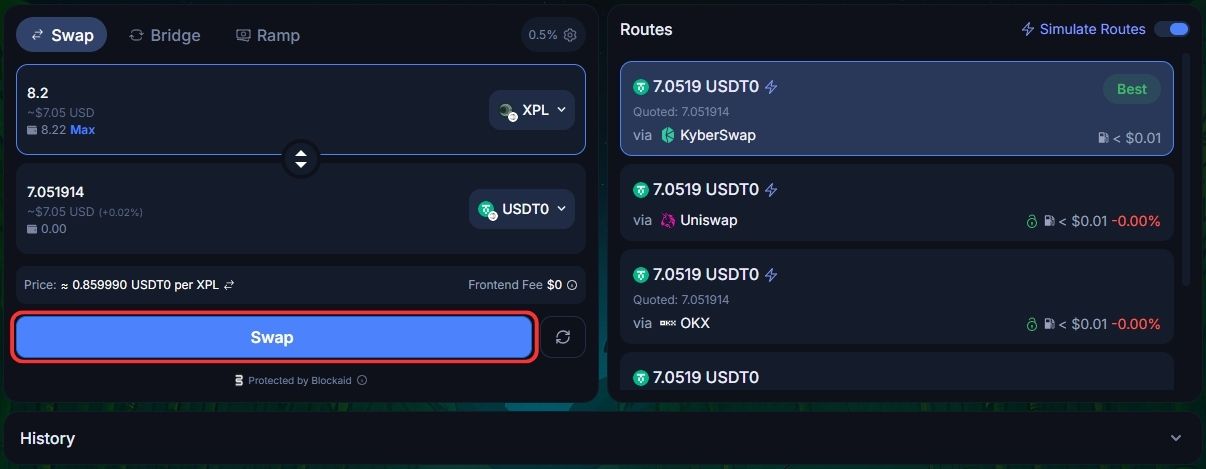
Step 5: Review the details carefully, then click “Swap” to complete the exchange from XPL to USDT.
Using Plasma Transfer and Plasma Savings
Now that everything is set up, you can either send USDT using Plasma Transfer or deposit USDT into Plasma Savings to start earning yield. Here’s how:
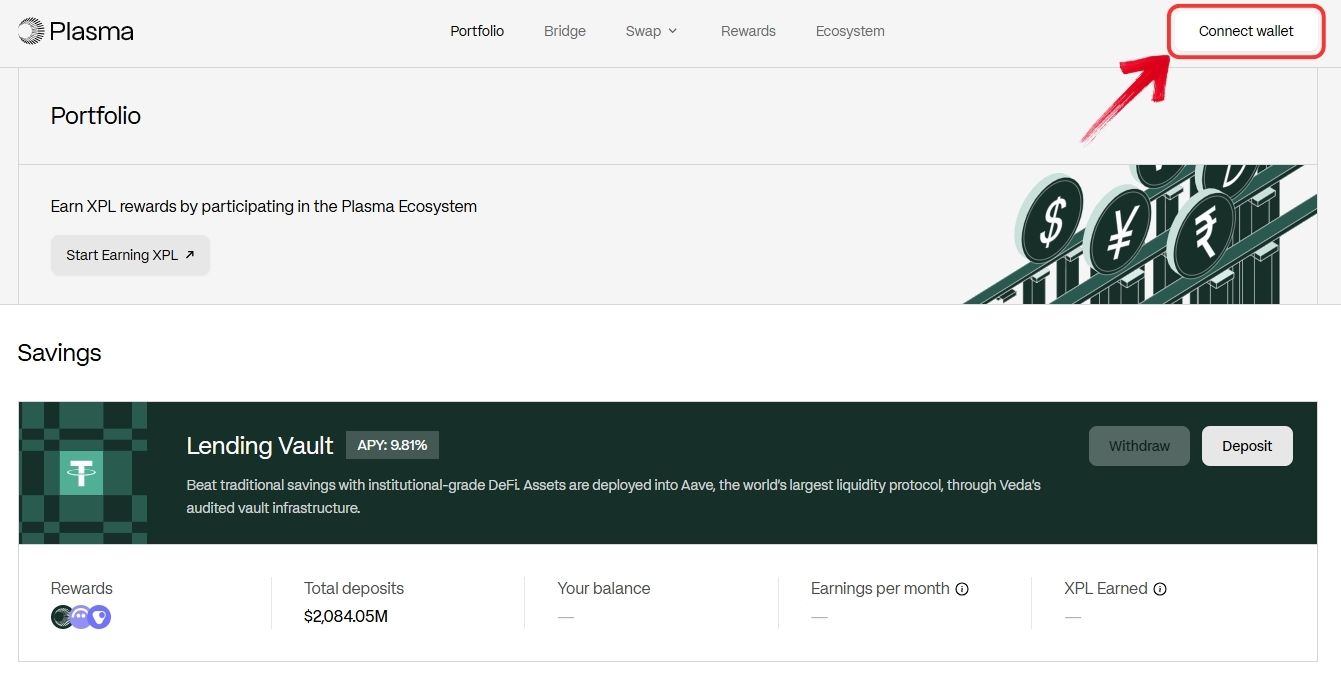
Step 1: Open your browser, go to the official Plasma website, and click on “Go to Dashboard”.

Step 2: On the Plasma dashboard, click the “Connect Wallet” button in the top-right corner.
Step 3: Once connected, scroll down to the Portfolio section. From here, you can transfer USDT to another Plasma wallet instantly.
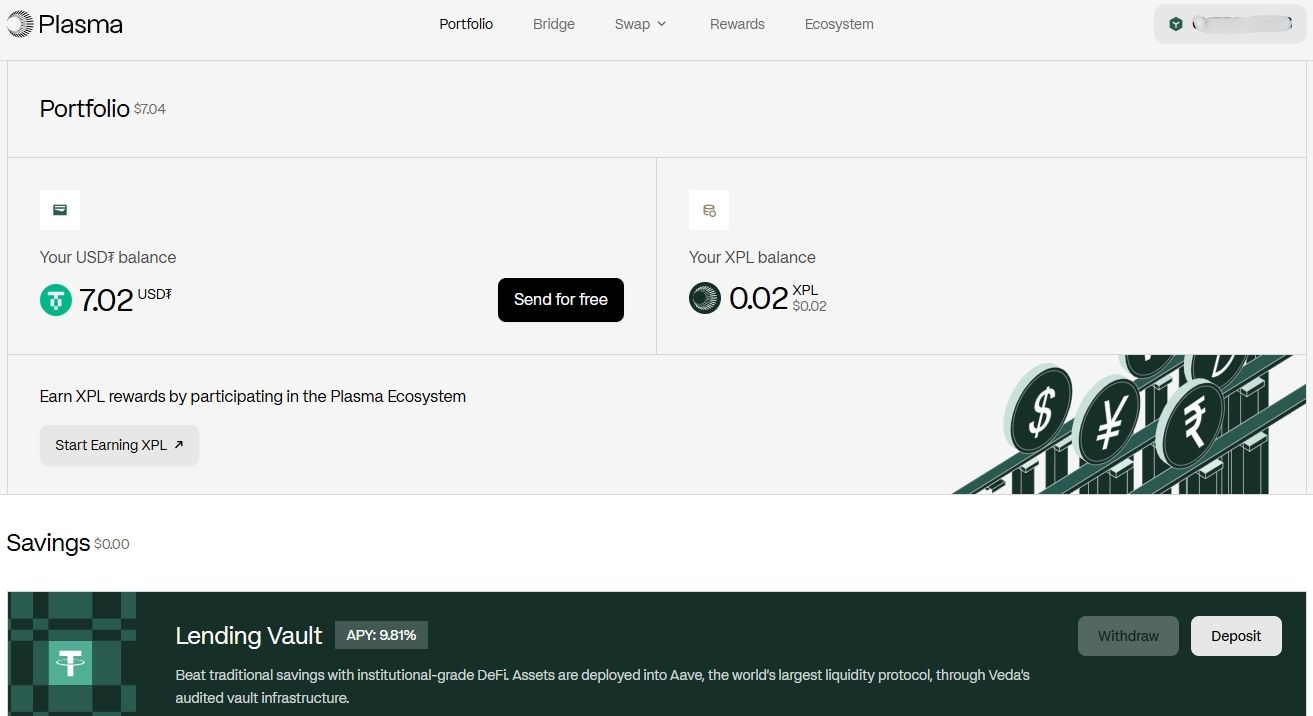
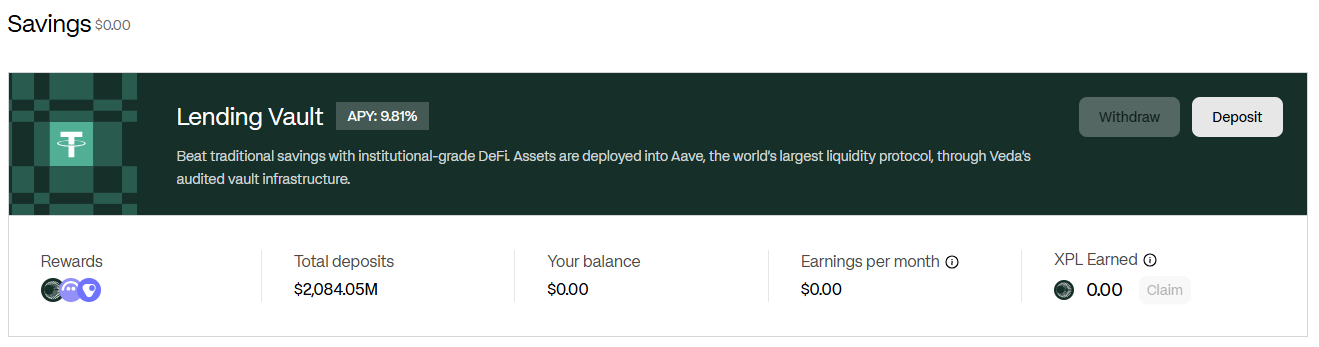
Step 4: Alternatively, head to the Savings section to deposit USDT. Plasma Savings currently offers up to 9%+ yield, though returns may vary over time.
Bottom Line
Plasma is a stablecoin-focused blockchain that has quickly gained traction, especially with the global stablecoin market now surpassing $300B+. Its integration with over 100 DeFi protocols, including names like Ethena and AAVE, shows strong early adoption.
That said, the user experience still has a few rough edges. Setting up wallets, securing gas tokens, and navigating new DeFi tools can feel complex for first-time users. But considering how young the network is, these are natural growing pains. By following the right steps; from getting XPL for gas, to swapping into USDT, and finally using Plasma’s transfers or savings vaults, users can unlock what the network has to offer today while positioning themselves early for its growth.
FAQs
1. Is Plasma EVM-compatible?
Yes. Plasma is EVM-compatible, so wallets like MetaMask and Trust Wallet work. You’ll interact with dApps the same way you do on other EVM chains, after adding the Plasma RPC.
2. What is the native gas token on Plasma?
XPL. Every on-chain action (swaps, transfers, lending, withdrawals) consumes a small amount of XPL. Keep a buffer of XPL in your wallet so you don’t get stuck.
3. Are Plasma USDT transfers free?
Fees can change. Some products may subsidize or reduce user-facing fees, but gas is still paid in XPL at the network level. Always review the fee quote before confirming.
4. Can I bridge assets from other chains to Plasma?
Yes. Plasma officially supports bridging through platforms like Oku Trade and Stargate Finance. These bridges allow you to move tokens from other chains directly onto Plasma in a secure way. While centralized exchanges that support Plasma withdrawals remain the simplest option for beginners, official bridges give you more flexibility if you want to move assets from networks like Ethereum or BNB Chain. Always use the links provided on the official Plasma website to avoid phishing risks.