
Unlike centralized exchanges like Binance, where you can easily sell a token on one blockchain and buy another on a different chain, this isn’t directly possible in MetaMask without using a bridge. In this article, we’ll explore the MetaMask bridge functionality and how you can seamlessly swap tokens from one blockchain (like Ethereum) to another token on a different chain (such as Binance Smart Chain or Polygon).
What is a Bridge
A bridge is a simple mechanism that allows MetaMask users to transfer tokens between different blockchains. For example, let’s say you have the memecoin Floki, which is on the Ethereum network, but you want to use your assets on the Binance Smart Chain. Users can use the MetaMask bridge to transfer Floki or other tokens from Ethereum to Binance Smart Chain — retaining their value. Once on the Binance Smart Chain, users can then swap their bridged tokens for other assets available on that network.
However, if you’re looking to exchange your tokens within the same network, such as exchanging Ethereum for Pepe, simply use MetaMask Swaps for this, saving on additional gas fees.
How to use the MetaMask Bridge
Now let’s have a look at the MetaMask bridge in action. Let’s say I need to make a very simple transaction, and I want to swap my Tether token on the Binance Smart Chain to Tether on the Ethereum network. Here are the steps that would allow me to use the MetaMask bridge effectively:
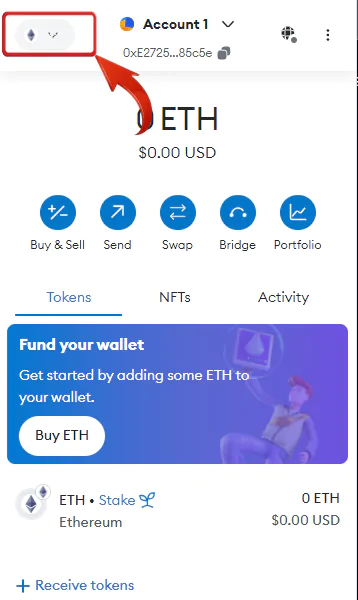
Step 1: Click on the MetaMask icon in Google Chrome extensions to open the MetaMask wallet.
Step 2: Make sure you’re connected to “Binance Smart Chain” by clicking on the “Select a Network” button.
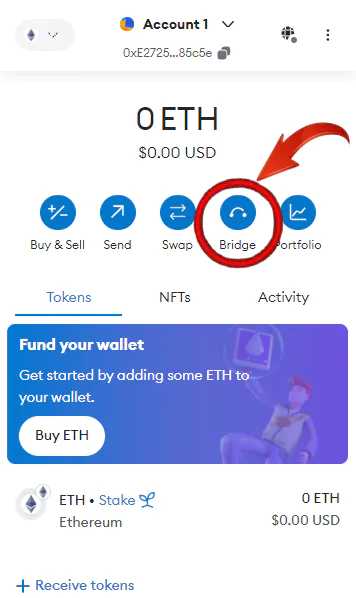
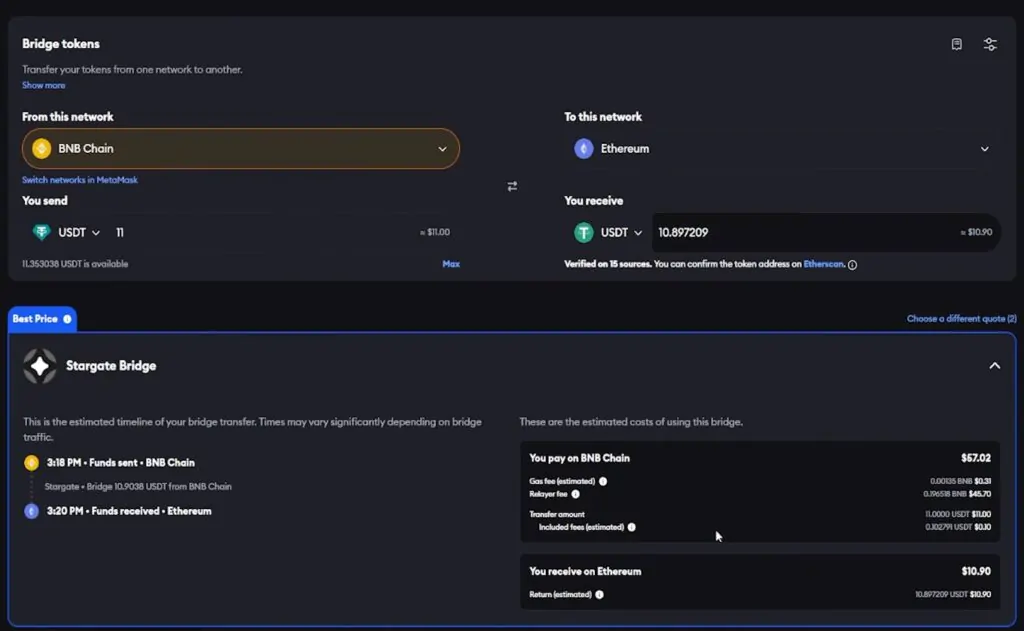
Step 3: Once the network has been chosen, click on the “Bridge” button to expand MetaMask and use the MetaMask bridge feature. MetaMask will open in a new tab, and we have a few key fields to fill for the MetaMask bridge to get into action.
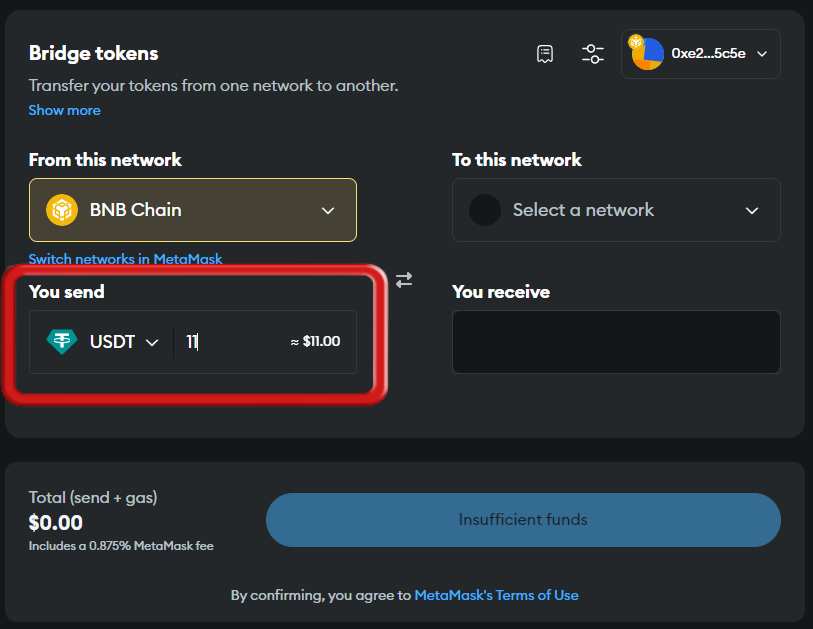
Step 4: The first field is the “From this Network” field. Here we will select the network where our current tokens are. For our example, we will select “BNB Chain”.
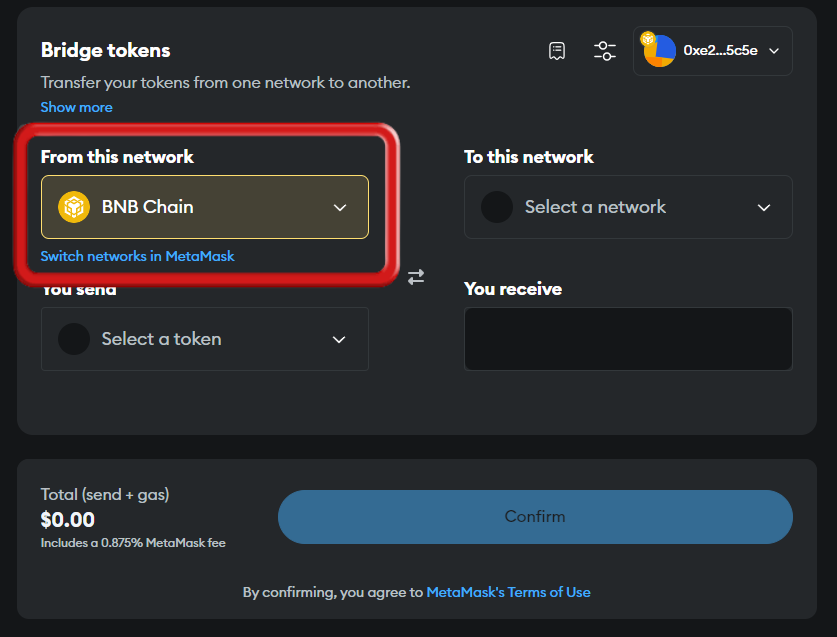
Step 5: Next is the “You Send” field, where you select the token you want to swap for another token. We will select “USDT” and then enter the amount we would like to swap.
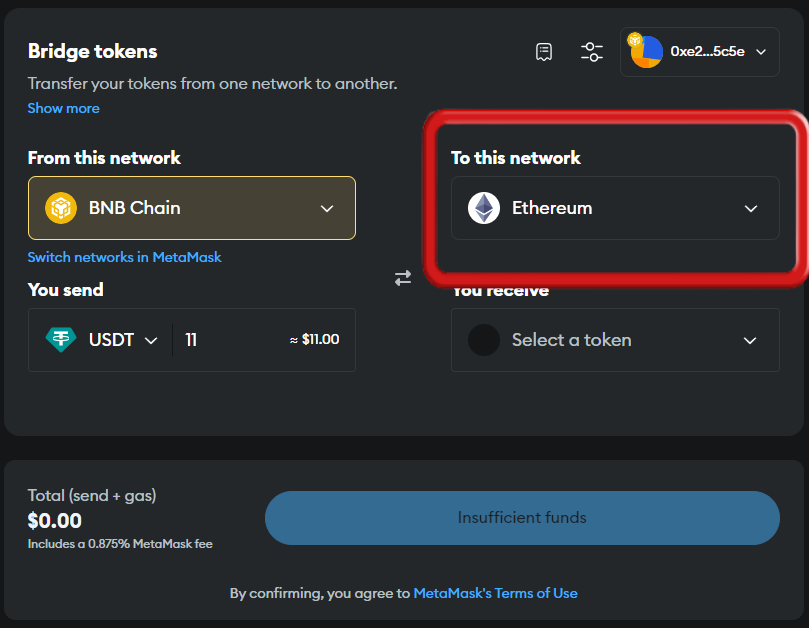
Step 6: Now, let’s move on to the details of the other network. First, we have the “To this Network” field, where we will select “Ethereum”.
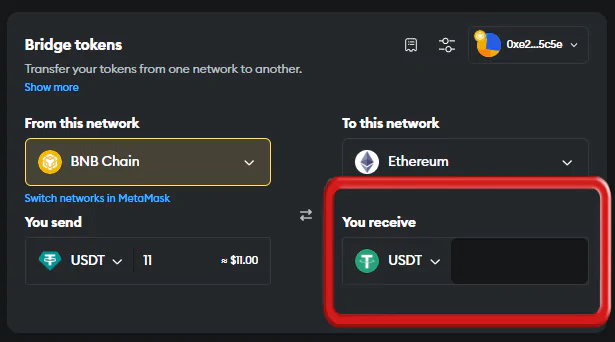
Step 7: For the last field, we have the “You receive” field, where we will add the token we would like to get from our swap, which will be “USDT” again but on the Ethereum network.
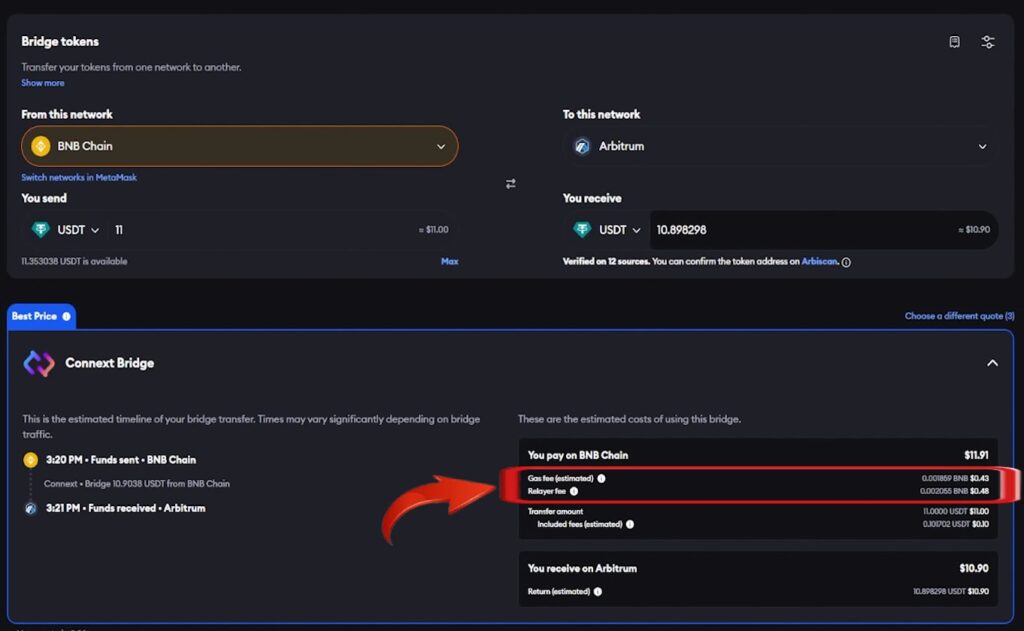
Step 8: MetaMask will get the best quotes available, which may take a few moments. The results will be displayed at the bottom. To have a more comprehensive view of the total charges, click on the arrow to expand.
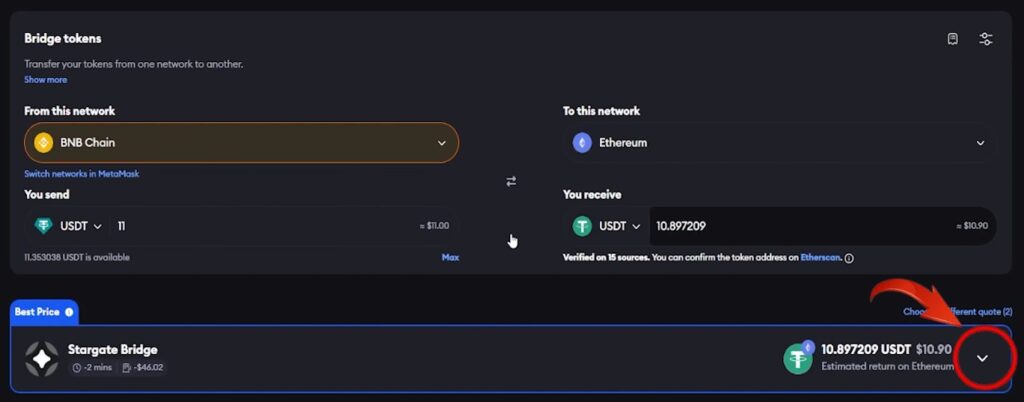
Step 9: Here, you can see all the costs associated with the bridge and how much will be received at the end.
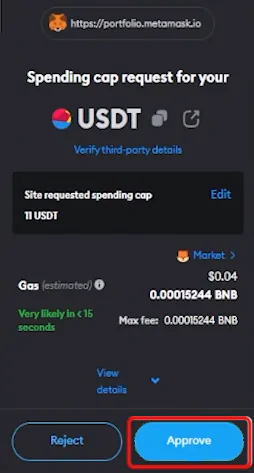
Step 10: To complete your swap, simply click on the “Approve Token” to proceed.

Note: If you haven’t switched networks, before approving the token, you will receive a prompt to switch networks, followed by token approval.
Step 11: The MetaMask extension will pop up for approval. Click on “Approve” to proceed.
Step 12: Once approved, next click on “Confirm” to bridge your tokens.
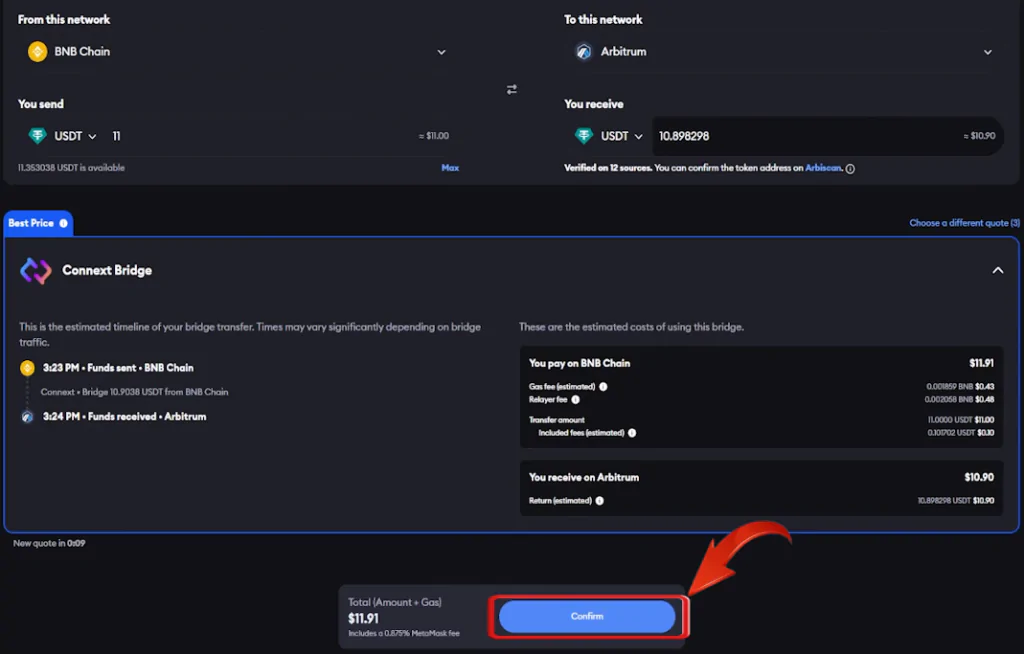
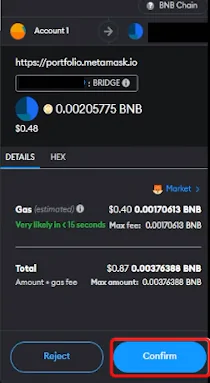
Step 13: MetaMask will pop up again. Click on “Confirm” to move forward with bridging the token to another.
And that’s it, you have your token swapped for another on a different chain. However, notice how high the gas fees were? This is because, at times, the Ethereum network can be very congested, resulting in a large amount of fees. To avoid this, users can use a Layer 2 solution such as Base or Arbitrum to make their swaps, which can dramatically reduce the gas fees.
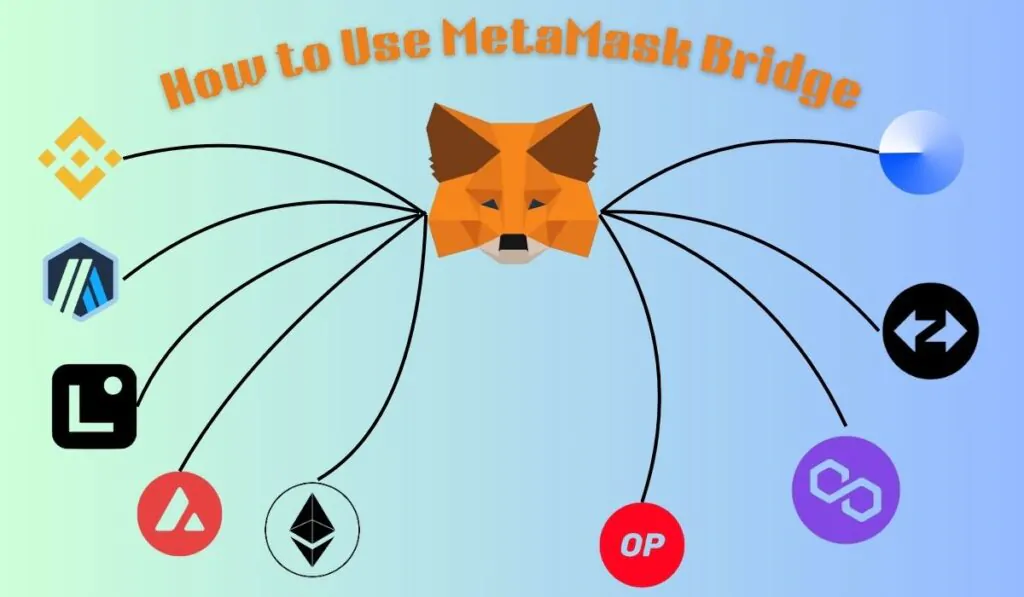
Expansive Network Compatibility
When it comes to MetaMask Portfolio diversity, it offers a robust bridging service that enables users to transfer a variety of tokens across multiple blockchain networks. This feature supports transactions up to $50,000 per transfer.
The service extends its support to nine major blockchain networks, providing users with a wide range of options for their cross-chain transactions:
- Ethereum (the original blockchain)
- Arbitrum (Layer 2 scaling solution)
- Optimism (another Layer 2 solution)
- Binance Smart Chain (BSC)
- Polygon (formerly Matic Network)
- Avalanche
- zkSync Era
- Linea
- Base
How are Bridge Fees Calculated?
Bridge fees in MetaMask are calculated based on several factors, resulting in a comprehensive ‘return’ figure. This figure represents the amount you’ll receive after all fees are deducted. Here’s a breakdown of how these fees are determined:
- MetaMask Fee: A flat 0.875% transaction fee is applied.
- Destination Network Gas:Typically covered by the bridge provider.
- Liquidity Provider and Validator Fees:Costs for relaying transactions across networks.
- Price Impact: Related to available liquidity and how your transaction affects it.
- Source Network Gas:Paid separately when signing the transaction.
When calculating the total cost, remember to include the gas fees from your source network along with the other fees mentioned. The variability in fees isn’t due to MetaMask’s pricing strategy, but rather stems from the unique designs of different bridges and the current state of network activity.
For your convenience, MetaMask provides a detailed breakdown of fees. You can easily access this by clicking the drop-down button in the quote interface. This transparency allows you to understand exactly where your funds are going.
Keep in mind that fees can fluctuate significantly between transactions, often due to factors beyond MetaMask’s control. It’s a reflection of the dynamic nature of blockchain networks.
Given these variables, it’s always wise to review the fee breakdown carefully before confirming any bridge transaction.
What is Refueling?
Refueling is a user-friendly feature offered by MetaMask during bridge transactions. It’s designed to streamline your cross-chain experience by ensuring you have the means to transact immediately on your destination network.
When you bridge tokens to a new blockchain, you typically need that chain’s native token to pay for gas fees. The Refueling feature in MetaMask automatically includes a small amount of the destination network’s native token in your bridge transaction. This eliminates the need to separately acquire, swap, or bridge for native tokens after your initial transfer. Here’s how it works:
- Availability: The refueling option appears for eligible bridge transactions, specifically when you’re bridging to a token other than the destination network’s native currency.
- Activation:To use this feature, simply toggle the refueling option when it appears during your transaction.
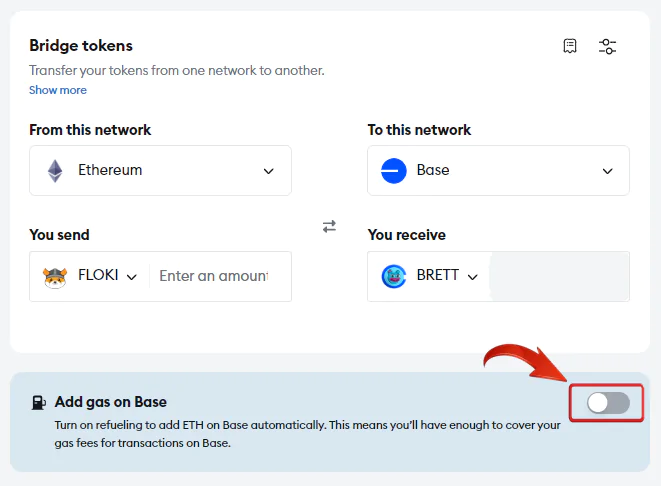
- Amount:When enabled, you’ll receive enough of the native token for approximately two transactions, calculated based on current gas prices.
Refueling is particularly beneficial for users new to a blockchain or those who want to ensure seamless interaction with their bridged assets. It’s a small but significant feature that can greatly enhance your cross-chain experience, saving you time and potential frustration. Remember, while refueling adds convenience, it may slightly increase your total transaction cost.
What are the Benefits of MetaMask Bridge?
MetaMask’s bridging feature offers several key advantages for users navigating the decentralized web. Here are the primary benefits:
- Comprehensive Aggregation:
MetaMask aggregates bridging options, saving users time and effort in finding the most suitable platforms for their needs.
- Enhanced Security:
Only thoroughly vetted bridging platforms are integrated, ensuring users interact with the most secure options available.
- Unparalleled Transparency:
Clear risk assessments, duration estimates, and precise pricing empower users to make informed decisions.
- Reliability and Quality:
MetaMask prioritizes dependable performance, maintaining high success rates for bridging transactions.
- User Autonomy:
As a free service, MetaMask imposes no restrictions, reinforcing its role as a true “passport” to the decentralized web.
- Seamless Cross-Chain Interactions:
Simplifies asset movement between blockchains, enhancing participation in diverse blockchain ecosystems.
Are there alternatives to bridging tokens?
Users who are new to blockchain technology may find using bridges for the first time somewhat confusing. Terms like native tokens, gas fees, and aggregator fees, while common in the crypto world, can be quite overwhelming for newcomers.
However, it’s important to note that using the MetaMask bridge isn’t the only option available. For example, if you want to swap Floki on the Ethereum network for a different token like Brett on the Base network, users can simply purchase it from centralized exchanges such as Bitget or Bybit.
Using centralized exchanges offers users a more convenient route to acquire their preferred tokens. This approach is often a better choice for crypto users who are less tech-savvy. It provides a simpler, more familiar interface that resembles traditional financial platforms, making it easier for newcomers to navigate the crypto space.
These exchanges handle the complexities of cross-chain transactions behind the scenes, allowing users to focus on buying and selling without needing to understand the intricacies of blockchain networks and bridging protocols.
FAQs
1. What Happens When I initiate a transfer on a bridge?
When you initiate a transfer, the bridge locks your tokens on the source chain and mints or releases an equivalent amount on the destination chain. The process involves smart contracts on both networks to ensure secure and accurate transfers.
2. How long does a bridge transaction typically take?
Bridge transaction times can vary depending on the networks involved and current congestion levels. It can range from a few minutes to several hours. Always check the estimated duration provided by MetaMask before confirming your transaction.
3. Is bridging safe?
While MetaMask only integrates thoroughly vetted bridging platforms, all cross-chain transactions carry some inherent risks. It’s important to use reputable bridges and double-check all transaction details before confirming.
Bridging the Gap in Blockchain Interoperability
Unlike centralized exchanges that handle cross-chain transactions for you, MetaMask’s bridge feature allows for direct interaction between blockchains, making it an essential skill for crypto enthusiasts and professionals alike. By following this guide on how to use MetaMask bridge you can get more control over your digital assets, making it a truly limitless tool for anyone involved in the decentralized web.